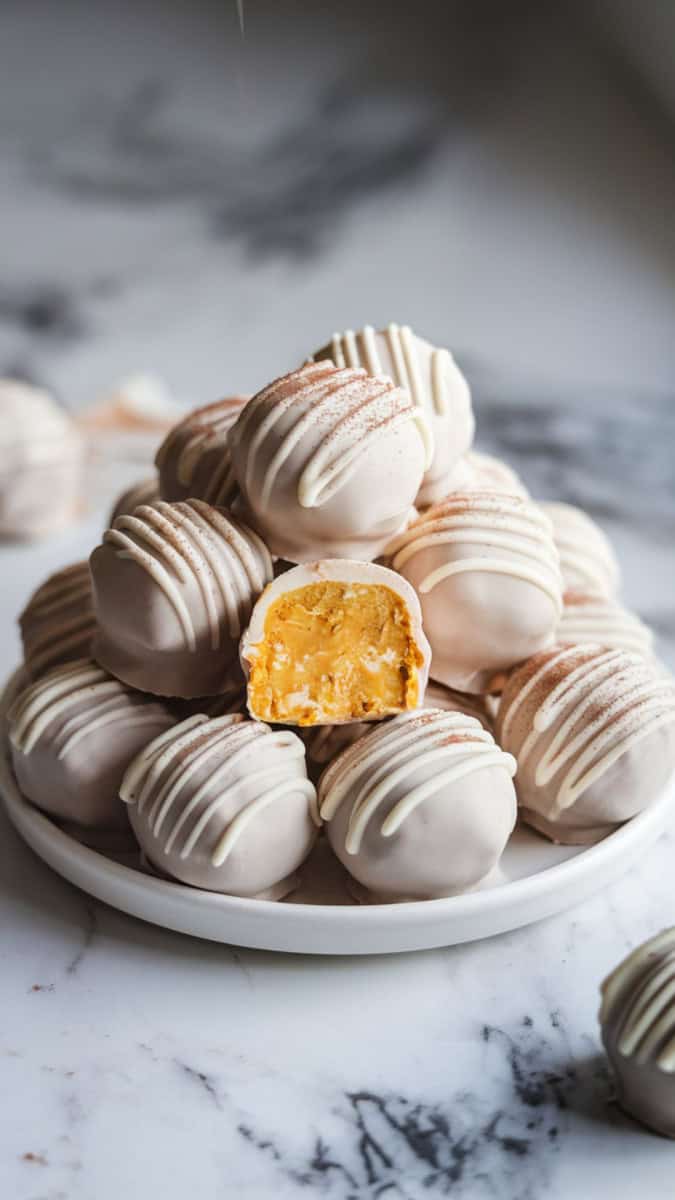
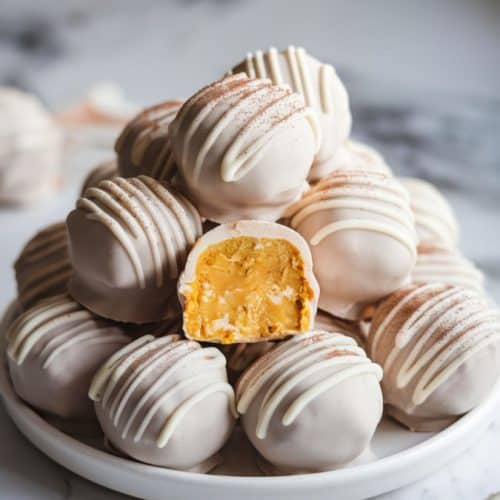
No-Bake Pumpkin Cheesecake Truffles (So Creamy & Delicious!)
These pumpkin cheesecake truffles are little bites of creamy pumpkin cheesecake goodness coated in smooth white chocolate perfect for fall parties, gift boxes, or a quick holiday dessert. They’re no-bake, come together in just a few steps, and taste like a mix between pumpkin pie and cheesecake with a decadent candy coating. My family loves them because they’re rich, perfectly spiced, and bite-sized just enough to satisfy a sweet tooth without feeling too heavy.

Why You’ll Love These Pumpkin Cheesecake Truffles
These truffles are bite-sized, decadent, and freezer-friendly, making them perfect for entertaining or gifting. They look impressive but require no baking just mix, roll, dip, and chill.
Simple Ingredients
Here’s what you’ll need:
- Pumpkin Puree: The base for that fall flavor.
- Cream Cheese: Softened for a rich, creamy texture.
- Graham Cracker Crumbs: Helps bind and gives a cheesecake-like flavor.
- Powdered Sugar: Adds sweetness and stability.
- Pumpkin Pie Spice: For that warm, cozy pumpkin spice flavor.
- White Chocolate: For coating the truffles (you can also use dark or milk chocolate).
Servings and Timings
Servings: About 20 truffles
Prep Time: 25 minutes
Chill Time: 2 hours
Total Time: 2.5 hours

What is Needed
- 4 oz cream cheese, softened
- 1/2 cup pumpkin puree
- 1 cup graham cracker crumbs
- 1 cup powdered sugar
- 1 tsp pumpkin pie spice
- 12 oz white chocolate (melting wafers or baking chocolate)
Instructions
- In a large mixing bowl, beat together the softened cream cheese, pumpkin puree, powdered sugar, graham cracker crumbs, and pumpkin pie spice using a hand mixer until the mixture is smooth and fully combined. Scrape down the sides of the bowl to make sure everything is evenly mixed. Pro Tip: Make sure the cream cheese is softened to room temperature this helps create a smooth, lump-free filling.
- Cover the bowl tightly with plastic wrap and refrigerate for 30–60 minutes, or until the mixture is firm enough to roll without sticking to your hands. Pro Tip: If the mixture still feels too soft after chilling, add an extra tablespoon or two of graham cracker crumbs to thicken it.
- Using a small cookie scoop or spoon, portion out about 1 tablespoon of the mixture for each truffle. Roll between your palms to form smooth, even balls, and place them on a parchment-lined baking tray.
- In a microwave-safe bowl, melt the white chocolate in 20–30 second intervals, stirring between each until smooth and fully melted. Pro Tip: For a thinner, easier-to-coat chocolate, stir in 1 teaspoon of coconut oil or shortening after melting.
- Using a fork or dipping tool, carefully dip each truffle into the melted white chocolate, letting any excess drip off, then place back on the parchment-lined tray. Work in batches so the filling doesn’t soften too much.
- Refrigerate the coated truffles for at least 30 minutes, or until the chocolate is fully set. For extra flair, drizzle with more melted white chocolate or sprinkle with cinnamon before serving. Pro Tip: Store in mini candy cups or decorative boxes if giving as gifts they make beautiful homemade holiday treats.
Top Tips
- Use softened cream cheese for a smooth filling.
- Work in batches when dipping truffles so the filling stays firm.
- Add 1 tablespoon coconut oil to melted chocolate for a smoother coating.
Fun Enhancements
- Swap white chocolate for dark or milk chocolate.
- Roll the truffles in crushed gingersnaps or pecans instead of dipping.
- Add a splash of vanilla or maple extract to the filling for extra flavor.
Recipe Variations
- Make them vegan with dairy-free cream cheese and chocolate.
- Add a tablespoon of bourbon for a boozy holiday twist.
- Coat in cocoa powder for a less sweet option.
Recommended Equipment
- Mixing bowls
- Hand mixer
- Baking tray lined with parchment
- Microwave-safe bowl for melting chocolate
Make Ahead Tips
These truffles are perfect for making ahead store in the fridge for up to 1 week or freeze for up to 2 months.
How to Store & Reheat
- Refrigerate: Store in an airtight container for up to 1 week.
- Freeze: Freeze on a tray, then transfer to a container for up to 2 months. Thaw in the fridge.
Troubleshooting Your Pumpkin Cheesecake Truffles
Why is my filling too soft?
- Chill longer or add extra graham cracker crumbs to firm up.
My chocolate coating cracked what went wrong?
- The truffles were too cold. Let them sit at room temperature for 5 minutes before dipping.
The coating is too thick how can I fix it?
- Stir in a little coconut oil or shortening to thin out the melted chocolate.
How to Serve It Beautifully
Serve truffles on a tiered dessert stand for parties or package them in mini candy cups inside gift boxes for holiday gifts.
About This Recipe
Pumpkin Cheesecake Truffles take inspiration from two popular American desserts cheesecake truffles (which became trendy in the early 2000s thanks to food bloggers and candy makers) and the classic pumpkin pie, a staple of American holiday tables since the 17th century.
Combining the creamy tang of cheesecake with the warm spices of pumpkin pie, these bite-sized confections became especially popular in the 2010s as part of the “pumpkin spice everything” trend that dominates autumn baking.
Check out my fall dessert recipes.
No-Bake Pumpkin Cheesecake Truffles
Equipment
- Mixing bowls
- Hand mixer
- Baking tray lined with parchment
- Microwave-safe bowl for melting chocolate
Ingredients
- 4 oz cream cheese softened
- 1/2 cup pumpkin puree
- 1 cup graham cracker crumbs
- 1 cup powdered sugar
- 1 tsp pumpkin pie spice
- 12 oz white chocolate melting wafers or baking chocolate
Instructions
- In a large mixing bowl, beat together the softened cream cheese, pumpkin puree, powdered sugar, graham cracker crumbs, and pumpkin pie spice using a hand mixer until the mixture is smooth and fully combined. Scrape down the sides of the bowl to make sure everything is evenly mixed. Pro Tip: Make sure the cream cheese is softened to room temperature this helps create a smooth, lump-free filling.
- Cover the bowl tightly with plastic wrap and refrigerate for 30–60 minutes, or until the mixture is firm enough to roll without sticking to your hands. Pro Tip: If the mixture still feels too soft after chilling, add an extra tablespoon or two of graham cracker crumbs to thicken it.
- Using a small cookie scoop or spoon, portion out about 1 tablespoon of the mixture for each truffle. Roll between your palms to form smooth, even balls, and place them on a parchment-lined baking tray.
- In a microwave-safe bowl, melt the white chocolate in 20–30 second intervals, stirring between each until smooth and fully melted. Pro Tip: For a thinner, easier-to-coat chocolate, stir in 1 teaspoon of coconut oil or shortening after melting.
- Using a fork or dipping tool, carefully dip each truffle into the melted white chocolate, letting any excess drip off, then place back on the parchment-lined tray. Work in batches so the filling doesn’t soften too much.
- Refrigerate the coated truffles for at least 30 minutes, or until the chocolate is fully set. For extra flair, drizzle with more melted white chocolate or sprinkle with cinnamon before serving. Pro Tip: Store in mini candy cups or decorative boxes if giving as gifts they make beautiful homemade holiday treats.
Notes
- Chill filling well before rolling.
- Add coconut oil to melted chocolate for smoother coating.
One-Pot Cooking Rocks!

Michelle
Hi, I’m Michelle, the founder, owner, author, and editor of OvenSpot. My passion for one-pot cooking commenced when I was working to prepare cafeteria lunches for school students. I am now on a mission to assist you in choosing the cooking pot or appliance you will use daily. As well as in-depth information to assist you in using and caring for your cookware and appliances. Along with the yummy recipes I use at home.
Questions? Reach out to Michelle at [email protected]