Buttery Heart Sugar Cookies with Easy Royal Icing
These heart sugar cookies are a fun and feel-good treat perfect for celebrating yourself or someone you love. The dough is easy to roll and holds its shape beautifully, making it ideal for cookie cutters. The royal icing adds a sweet, smooth finish that dries with a gorgeous shine, so they’re perfect for gifting or sharing. Whether you go with classic pink or bold custom colors, these cookies are a joy to make and eat.

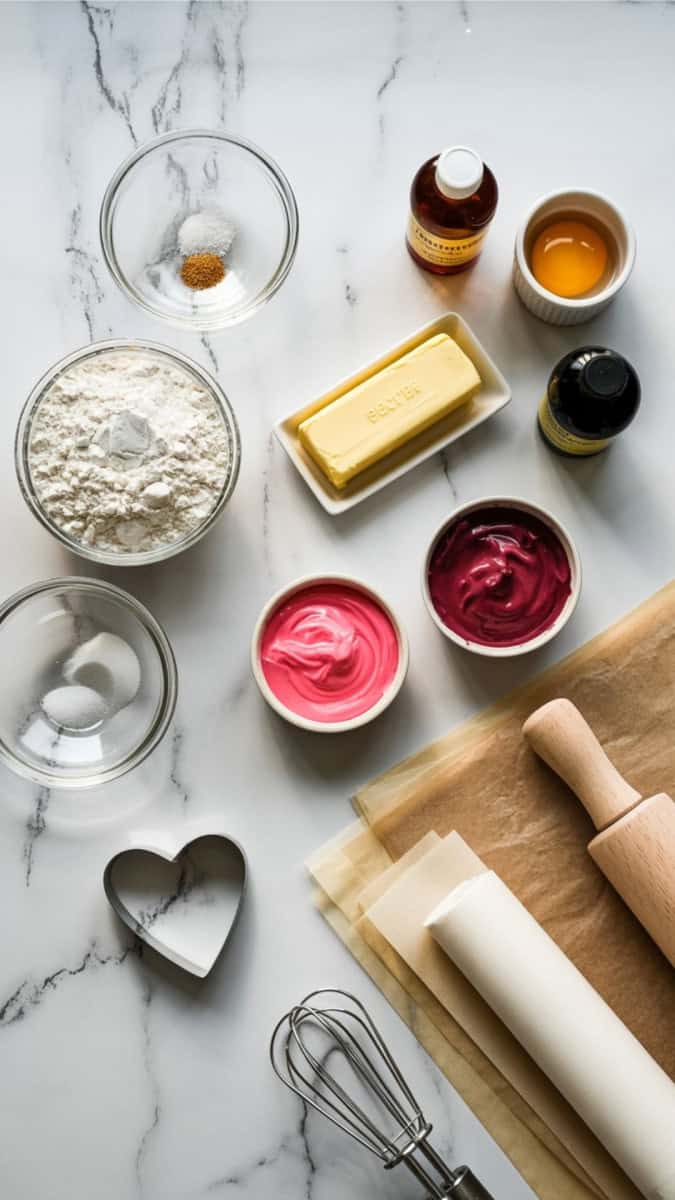
Simple Ingredients
Here’s what goes into these cheerful cookies each one brings something special:
- All-Purpose Flour: Gives the cookies structure and just the right amount of chew.
- Baking Powder: Provides a slight lift to keep the cookies from being too dense.
- Salt: Enhances all the sweet flavors and balances out the sugar.
- Unsalted Butter: Adds rich, creamy flavor and a soft, tender texture.
- Granulated Sugar: Sweetens the dough and helps the cookies bake up with a slight crisp edge.
- Large Egg: Binds everything together and adds moisture.
- Vanilla Extract: Classic flavor that makes everything taste like a warm hug.
- Almond Extract: Adds a little something special that makes these cookies stand out.
Servings: About 24 cookies
Prep Time: 20 minutes
Chill Time: 1 hour
Cook Time: 10 minutes
Total Time: 1 hour 30 minutes
What is Needed
2 3/4 cups all-purpose flour
1 teaspoon baking powder
1/2 teaspoon salt
1 cup unsalted butter, softened
1 1/2 cups granulated sugar
1 large egg
1 teaspoon vanilla extract
1 teaspoon almond extract
Royal icing (store-bought or homemade), tinted with food coloring of your choice
Instructions
- In a medium bowl, whisk together the flour, baking powder, and salt. Set aside.
- In a large mixing bowl, beat the softened butter and granulated sugar with a hand mixer until light and fluffy about 2–3 minutes.
- Add in the egg, vanilla extract, and almond extract, mixing until fully incorporated.
- Slowly add the dry ingredients to the wet mixture, mixing just until a soft dough forms.
- Divide the dough into two portions, flatten into discs, wrap in plastic wrap, and chill for at least 1 hour.
- Preheat oven to 350°F (175°C). Line baking sheets with parchment paper.
- On a lightly floured surface, roll dough to about 1/4 inch thickness. Use a heart-shaped cookie cutter to cut out cookies.
- Place cookies on prepared baking sheets about 2 inches apart.
- Bake for 8–10 minutes, or until edges are lightly golden.
- Let cookies cool on the baking sheet for 5 minutes, then transfer to a wire rack to cool completely.
- Once cooled, decorate with royal icing and allow to set completely before serving or storing.

Top Tips
- Chill the dough for at least an hour this helps the cookies hold their shape when baking.
- Use gel food coloring in the royal icing for vibrant colors that won’t water it down.
- Pipe outlines first, then flood the inside with a thinner icing for smooth coverage.
- Let kids decorate their own cookies it’s a mess worth making and creates sweet memories.
- Store cookies flat while icing dries to keep your designs looking perfect.
Recipe Variations
- Use lemon or orange extract instead of almond for a citrus twist.
- Add a few mini chocolate chips to the dough for a fun surprise.
- Switch up the shapes for different holidays stars, flowers, or initials.
- Make sandwich cookies by spreading jam between two cookies.
Recommended Equipment
- Mixing bowls
- Hand mixer
- Measuring cups and spoons
- Rolling pin
- Heart-shaped cookie cutter
- Baking sheets
- Parchment paper
- Wire cooling rack
- Piping bags and small round tips
Make Ahead Tips
You can make the dough ahead of time and refrigerate it for up to 3 days, or freeze it for up to 1 month. Just thaw overnight in the fridge before rolling and cutting.
How to Store and Reheat
Store decorated cookies in an airtight container at room temperature for up to 5 days. If undecorated, they can be frozen for up to 2 months. No reheating needed just thaw and enjoy!
What To Serve With This Recipe
Serve with a tall glass of milk, a warm mug of tea, or even a bubbly rosé if you’re feeling fancy. These are also cute paired with chocolate-dipped strawberries for a Valentine-inspired treat plate.
What You Need to Know About This Recipe
Sugar cookies have been around for centuries, originally brought over by European settlers. Today, they’re a holiday staple and a favorite for celebrations like birthdays, Christmas, Valentine’s Day, and yes Singles Awareness Day. This version uses royal icing for a glossy, polished look that’s surprisingly easy to achieve once you get the hang of it. Whether you keep the decorations simple or go full Pinterest-mode, these cookies are always a hit.
More Cookie Recipes

Heart Sugar Cookies
Equipment
- Mixing bowls
- Hand mixer
- Measuring cups and spoons
- Rolling Pin
- Heart-shaped cookie cutter
- Baking sheets
- Parchment paper
- Wire cooling rack
- Piping bags and small round tips
Ingredients
- 2 3/4 cups all-purpose flour
- 1 teaspoon baking powder
- 1/2 teaspoon salt
- 1 cup unsalted butter softened
- 1 1/2 cups granulated sugar
- 1 large egg
- 1 teaspoon vanilla extract
- 1 teaspoon almond extract
- Royal icing store-bought or homemade, tinted with food coloring of your choice
Instructions
- In a medium bowl, whisk together the flour, baking powder, and salt. Set aside.
- In a large mixing bowl, beat the softened butter and granulated sugar with a hand mixer until light and fluffy about 2–3 minutes.
- Add in the egg, vanilla extract, and almond extract, mixing until fully incorporated.
- Slowly add the dry ingredients to the wet mixture, mixing just until a soft dough forms.
- Divide the dough into two portions, flatten into discs, wrap in plastic wrap, and chill for at least 1 hour.
- Preheat oven to 350°F (175°C). Line baking sheets with parchment paper.
- On a lightly floured surface, roll dough to about 1/4 inch thickness. Use a heart-shaped cookie cutter to cut out cookies.
- Place cookies on prepared baking sheets about 2 inches apart.
- Bake for 8–10 minutes, or until edges are lightly golden.
- Let cookies cool on the baking sheet for 5 minutes, then transfer to a wire rack to cool completely.
- Once cooled, decorate with royal icing and allow to set completely before serving or storing.
Notes
- Be sure to chill the dough for clean edges.
- Royal icing can be made ahead and stored in the fridge in airtight piping bags.
- You can use store-bought icing if you’re short on time!

Michelle
Hi, I’m Michelle, the founder, owner, author, and editor of OvenSpot. My passion for one-pot cooking commenced when I was working to prepare cafeteria lunches for school students. I am now on a mission to assist you in choosing the cooking pot or appliance you will use daily. As well as in-depth information to assist you in using and caring for your cookware and appliances. Along with the yummy recipes I use at home.
Questions? Reach out to Michelle at [email protected]