Pumpkin Carving Ideas: Creative Designs for Halloween
Halloween is the perfect time to get creative with your pumpkin carving skills. Whether you’re aiming for something spooky, fun, or downright artistic, these pumpkin carving ideas will help you transform your pumpkin into a show-stopping piece of Halloween art. From simple designs aimed at beginners to intricate masterpieces for the more skilled carver, there’s something for everyone.
If you’re looking for inspiration, consider classic jack-o’-lanterns, adorable Halloween cats, or even a fire-breathing dragon. Using various shapes and sizes of pumpkins can help you achieve unique and magical decorations that light up your night. Plenty of free pumpkin carving stencils are available for those seeking additional guidance to simplify the process and ensure success.
So grab your carving tools and prepare to impress your neighbors and trick-or-treaters alike. These ideas will make your porch the star of the neighborhood and provide a fun and memorable activity for the whole family.

Getting Started with Pumpkin Carving
Choosing the right pumpkin and having the essential carving tools on hand are key to an enjoyable pumpkin carving experience. With the right setup, your Halloween pumpkin carving project can become fun and engaging.
Choosing the Right Pumpkin
When picking a pumpkin, look for one that is fresh and has a sturdy stem. A flat bottom ensures it sits well on surfaces. Aim for a pumpkin with smooth skin, as it’s easier to carve and allows for more detailed designs.
Size matters, too. A larger pumpkin provides more space for intricate carvings, which is ideal for using Halloween pumpkin carving stencils. Smaller pumpkins are great for simpler designs or for kids.
Check for soft spots by pressing gently around the pumpkin. Soft areas can indicate rot, which compromises the carving process. Finally, choose a pumpkin with an even color and avoid those with deep ridges, as these can make carving more challenging.
Essential Carving Tools

Start with a pumpkin carving kit which typically includes serrated saws and precision tools designed specifically for cutting through thick pumpkin skin safely and cleanly. These kits make both simple and detailed carving much easier.
Use a sturdy scoop or scraper to remove the seeds and pulp, and to thin the pumpkin walls this helps your carving tools glide more smoothly and improves illumination from inside.
For transferring your design, rely on pumpkin stencils and a marker or poking tool to outline the pattern. This allows you to achieve accurate features, whether you’re carving a classic face or an intricate scene.
Prepare your area with a protective work surface like newspaper or a drop cloth to contain the mess and make cleanup a breeze.
Finally, once your masterpiece is complete, light it up with LED tea lights or fairy lights for a safe, flickering glow that brings your pumpkin carving to life.
Design and Inspiration
Discovering creative ways to carve pumpkins can elevate your Halloween decorations to the next level. From classic styles to elaborate themes suitable for contests, there are endless ideas to suit your needs.
Classic Carved Pumpkin Ideas

You can start with a traditional jack-o’-lantern. These classic designs typically feature triangular eyes and a jagged smile.
For a twist, consider carving a cute pumpkin carving design, such as a smiling cat or a friendly ghost. These simpler designs are not only easier to carve but can also be an enjoyable activity for kids.
Experiment with different facial expressions or add accessories like hats or carved leaves to make your pumpkins stand out. Use basic tools like pumpkin carving kits, which often include saws, scoops, and etching tools for detail work.
Creative Themes for Contest

If you aim to impress in a creative pumpkin carving contest, think outside of the box. Themes based on popular movies or characters, such as Disney princesses or superheroes, always garner attention.
Scary Halloween pumpkins featuring detailed carvings of monsters, witches, and ghouls can be a hit. Adding elements like LED lights inside the pumpkins can enhance the spooky effect.
Consider using multiple pumpkins to create a scene or tableau. For example, a group of pumpkins can portray a haunted house or a pumpkin patch invaded by zombies. This approach makes your display more dynamic and intriguing.
Utilizing Halloween Stencils

Halloween stencils can simplify the process of creating detailed designs. You can find stencils for a variety of themes, including cute pumpkin carving patterns and more complex images like skeletons or haunted trees.
First, you print the stencil and attach it to the pumpkin’s surface. Then, use a small knife or pumpkin carving tool to prick the outlines before cutting.
Stencils ensure consistent and precise results, making it easier to achieve intricate designs even for beginners. For more spooky inspiration, check out these pumpkin carving ideas, which include both beginner-friendly and advanced templates.
Carving Techniques and Tips
Mastering pumpkin carving involves understanding both basic and advanced techniques. By combining these methods, you can create stunning Jack O’ Lanterns that range from simple to intricate designs.
Basic Carving Methods

When starting out, you need the right tools. A pumpkin stencil kit, permanent markers, and carving tools or knives are essential. First, choose a larger pumpkin with lighter-colored flesh for easier carving. Examine it for bruises or soft spots to ensure it lasts longer.
Outline your design using a marker or stencil. Cut an opening at the top or bottom to scoop out the insides with a large spoon. This ensures the pumpkin is clean and ready for carving. Use a serrated knife to follow your outline, taking care to carve slowly and steadily for smooth edges.
Advanced Carving Techniques

For more detailed designs, advanced techniques like using sewing transfer paper can be beneficial. Place the transfer paper between your design and the pumpkin, and trace it to transfer the pattern onto the surface. This method is great for intricate designs.
Experiment with depth carving to add texture. By carving at different depths, you can create shading effects. Tools like gouges and chisels are ideal for this. Additionally, try using paint and metallic spray paint for added flair. Such techniques can elevate your pumpkin carving, making it a standout piece among your adult Halloween crafts.
Advanced methods may take time to master, but they allow for a range of creative possibilities, from spooky faces to enchanting animal carvings. Enjoy the process and have fun experimenting with different techniques to make your pumpkins truly unique.
Unique Pumpkin Carving Ideas for a Spooky-Cozy Halloween
Looking for fresh ways to decorate your pumpkins this year? These creative ideas blend cozy fall vibes with spooky Halloween style perfect for porches, parties, and everything in between.
Haunted House Silhouette Pumpkin
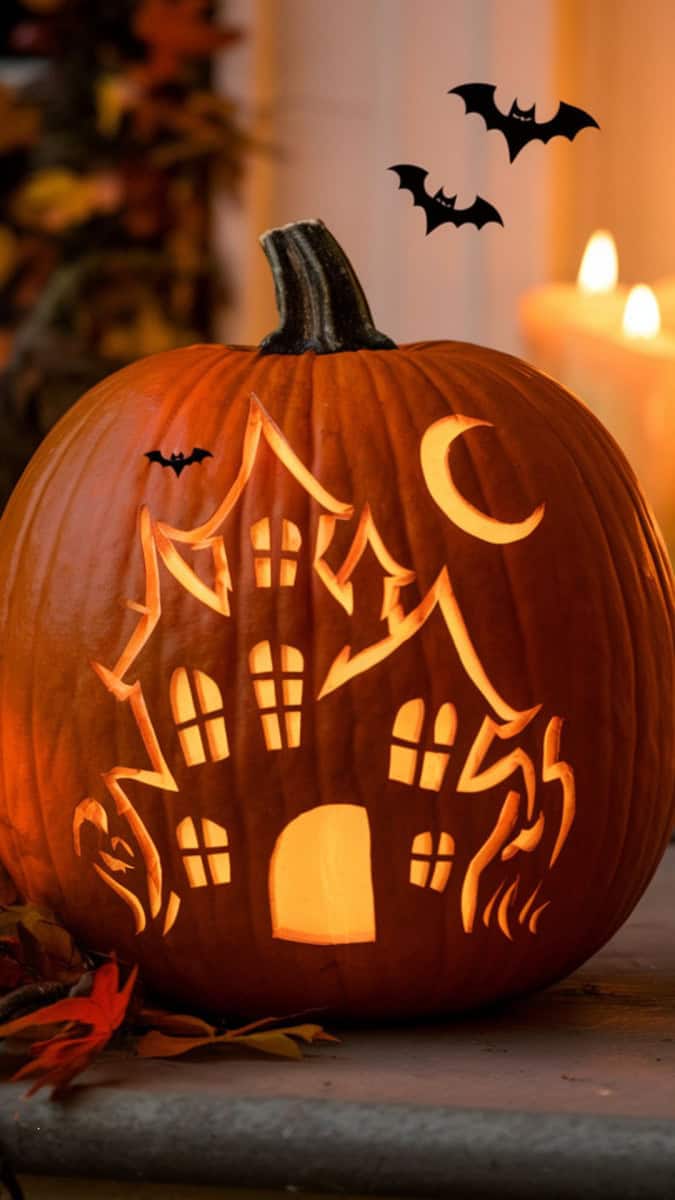
Bring the spooky season to life with a glowing haunted house carved right into your pumpkin. Add bats and a moon cutout for a dramatic porch display that’s both eerie and inviting.
What You Might Need:
- Medium or large pumpkin
- Carving kit with fine blades
- Haunted house stencil or sketch
- LED candle or tea light
How-To Steps:
- Hollow out your pumpkin and scrape the walls thin for easier carving.
- Trace or tape a haunted house stencil onto the surface.
- Carve windows, doors, and roof lines carefully for detail.
- Add small cutouts of bats or a crescent moon above the house.
- Place an LED light inside for a glowing, spooky silhouette.
Cat in the Moon Pumpkin
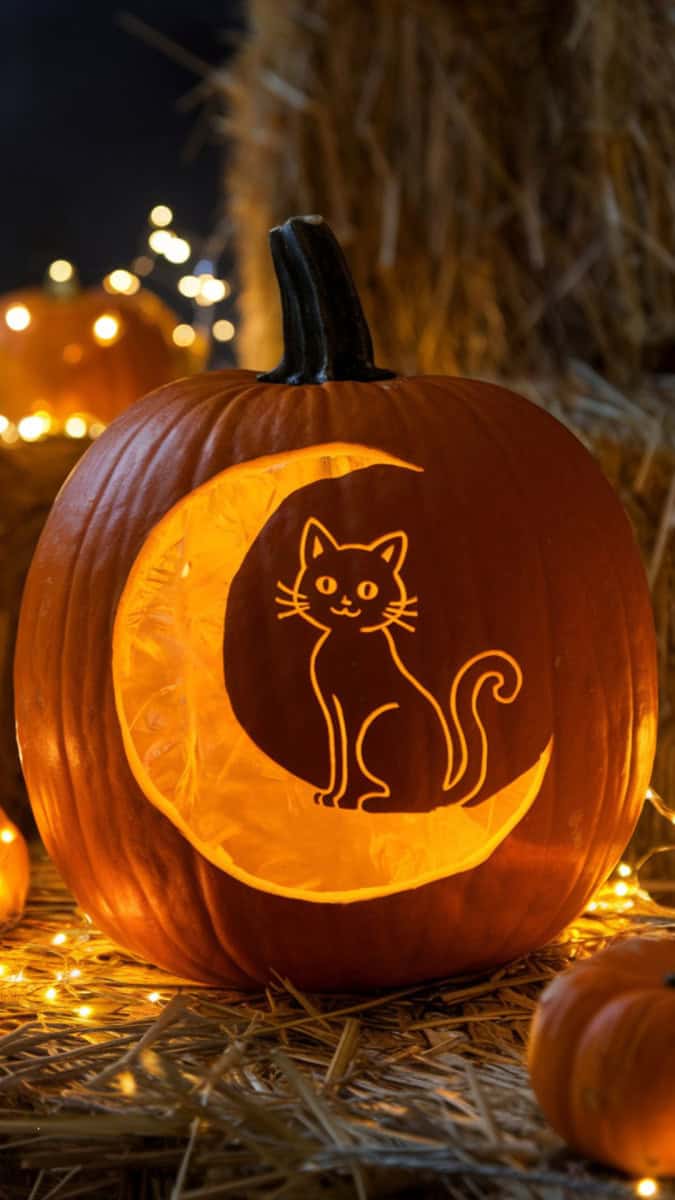
A black cat perched on a crescent moon makes a timeless Halloween design. This cozy carving feels magical, mysterious, and perfect for anyone who loves classic spooky charm.
What You Might Need:
- Medium pumpkin
- Carving knife set or precision tools
- Cat and crescent moon stencil
- LED candle
How-To Steps:
- Clean and hollow out your pumpkin.
- Sketch or stencil the moon and cat outline.
- Carve out the moon’s curve first, then carefully shape the cat’s silhouette.
- Keep the tail and ears sharp for definition.
- Light from inside to highlight the design.
Stacked Pumpkins with Different Faces
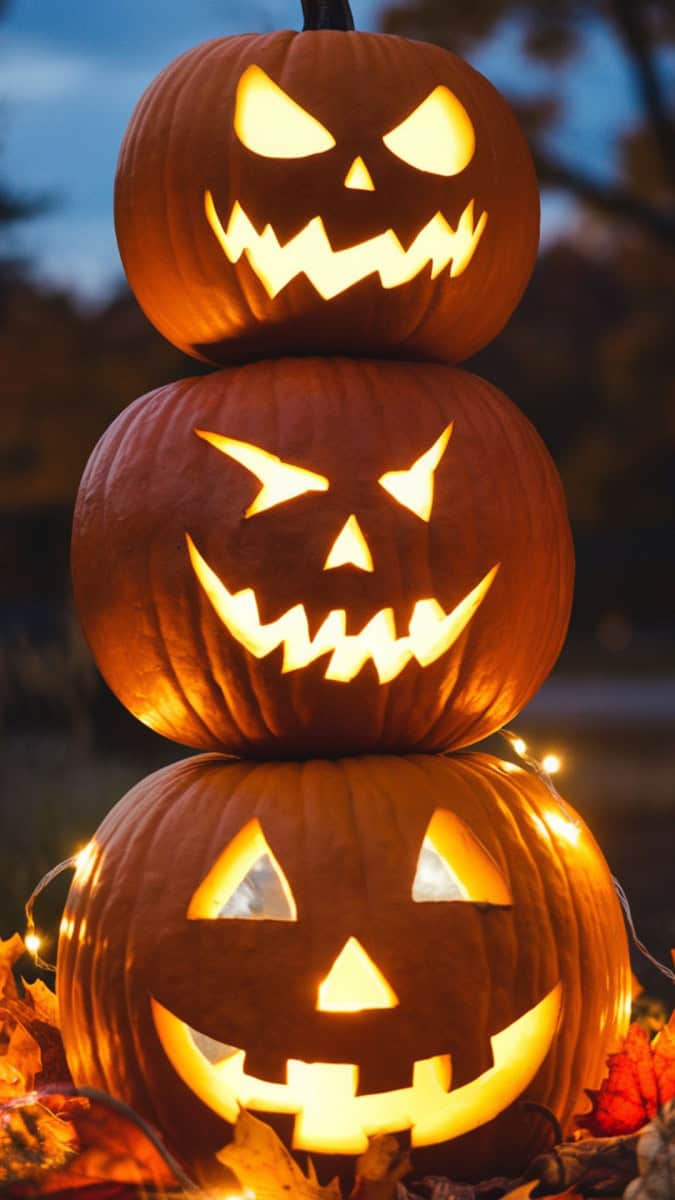
Why settle for one pumpkin when you can stack three? Carve each with a different expression happy, scary, or silly for a playful and eye-catching porch display.
What You Might Need:
- Three pumpkins in small, medium, and large
- Carving tools
- Wooden dowels or skewers for stability
- LED lights for each pumpkin
How-To Steps:
- Hollow out all three pumpkins.
- Carve each with a different face happy, scary, silly.
- Place the largest at the bottom, medium in the middle, smallest on top.
- Use wooden dowels to hold them securely.
- Light each one individually for a stacked glowing effect.
Witch Hat Pumpkin

Give your pumpkin a little personality by topping it with a witch’s hat. It’s a simple way to transform a carved face into a whimsical character full of Halloween spirit.
What You Might Need:
- Large pumpkin
- Carving tools
- Plastic or felt witch’s hat
- Black paint or markers (optional for details)
- LED light
How-To Steps:
- Hollow and carve a spooky or funny face.
- Dry the top and crown area thoroughly.
- Place a lightweight witch’s hat on top.
- Add optional details with paint or markers.
- Light from within to complete the look.
Owl Carved Pumpkin
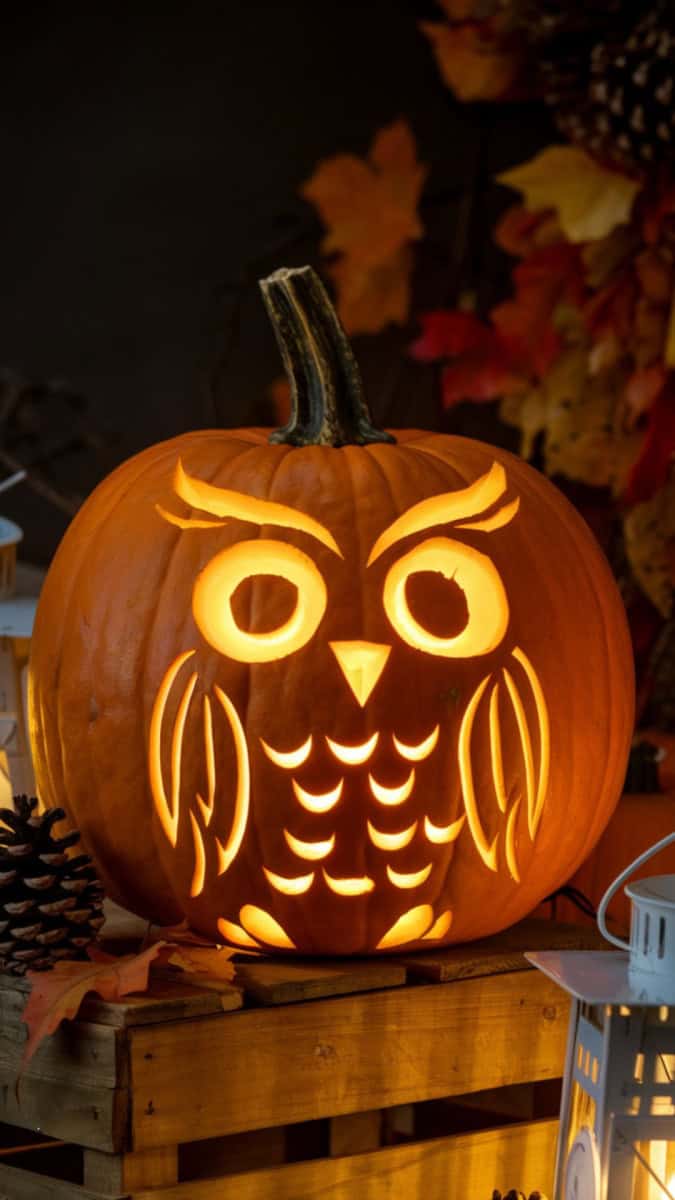
Not all pumpkin carvings need to be spooky. An owl design brings woodland magic to your display, glowing softly with big eyes and feathered details that are cozy and unique.
What You Might Need:
- Medium pumpkin
- Carving kit with round scoop tools
- Owl stencil or drawing
- LED candle
How-To Steps:
- Prep and hollow your pumpkin.
- Trace large round owl eyes near the center.
- Carve feather-like patterns around the eyes for texture.
- Cut a small beak triangle below.
- Place the LED light inside for a glowing woodland vibe.
Fairy Lights Pumpkin
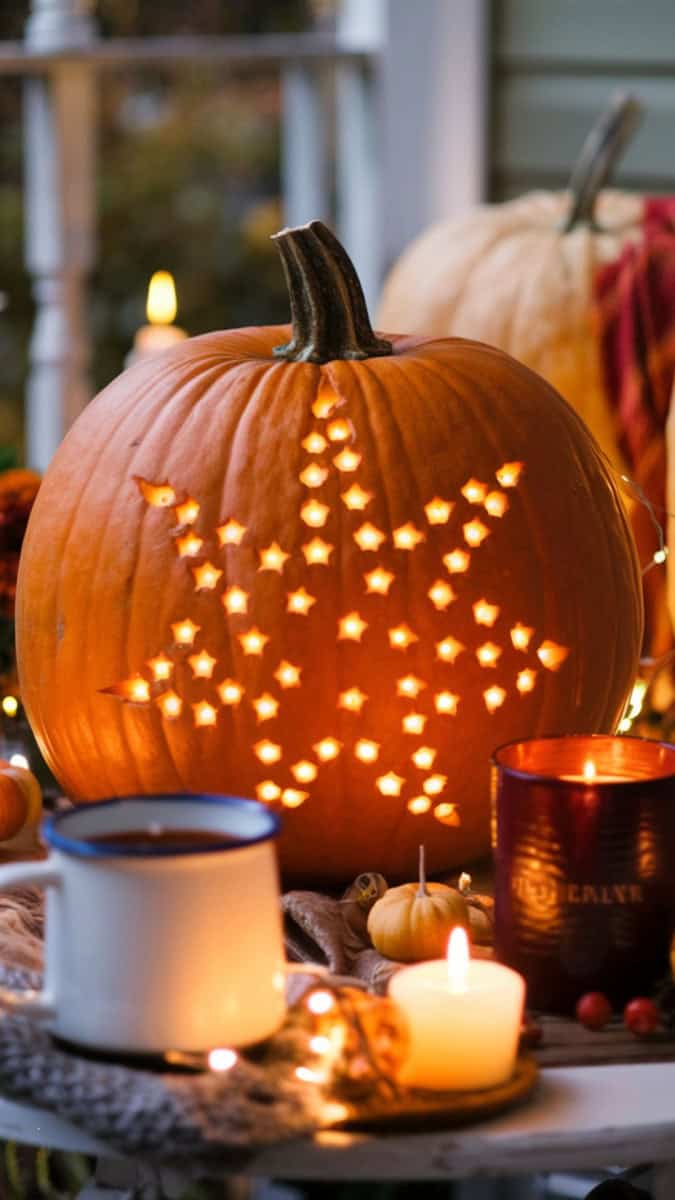
Swap out the scary faces for a twinkly design. By drilling tiny star-like holes and filling your pumpkin with fairy lights, you’ll create a glowing lantern that’s warm and enchanting.
What You Might Need:
- Large pumpkin
- Power drill with small drill bits
- String of battery-operated fairy lights
- Tape or clips to secure lights
How-To Steps:
- Hollow the pumpkin as usual.
- Drill holes in star or constellation patterns across the surface.
- Insert fairy lights inside and spread them evenly.
- Tape or clip the battery pack to the inside wall.
- Turn on for a magical starlit lantern effect.
Candy Holder Pumpkin
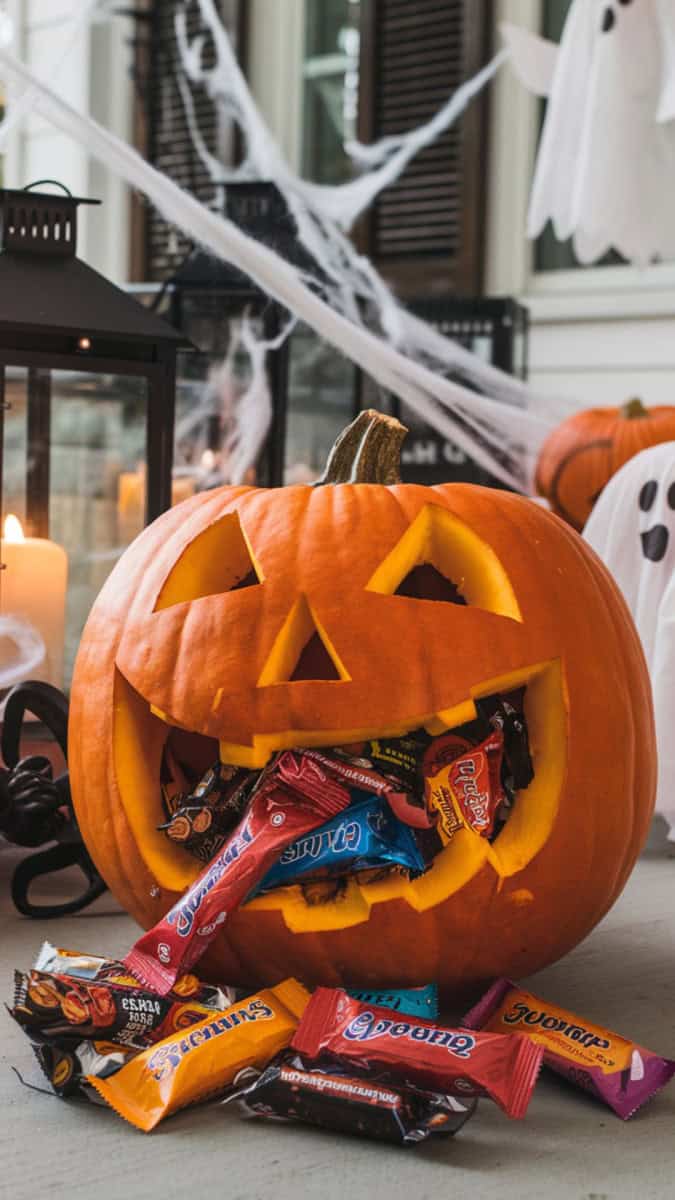
Turn your pumpkin into a candy station! Carve a wide-open mouth, fill it with wrapped sweets, and you’ll have décor that’s both festive and functional for trick-or-treat night.
What You Might Need:
- Large pumpkin
- Carving tools
- Large bowl or liner (optional, to keep candy dry)
- Wrapped Halloween candy
How-To Steps:
- Cut the top and hollow out your pumpkin.
- Carve a wide open mouth shape.
- Smooth the inside and place a liner or bowl inside if needed.
- Fill with wrapped candy so it spills out.
- Place on your porch for a festive candy station.
Vampire Pumpkin
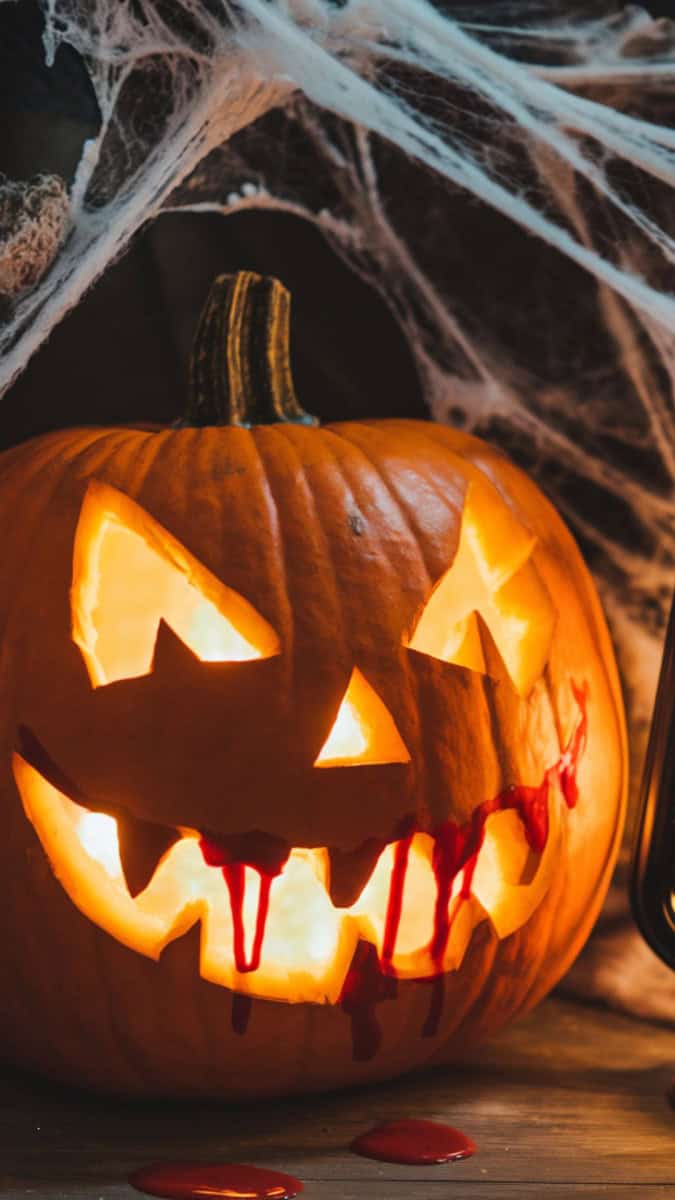
For a classic scare, carve a pumpkin face and give it vampire fangs. Add a touch of painted “blood” for a chilling design that will thrill Halloween lovers young and old.
What You Might Need:
- Medium pumpkin
- Carving kit
- Plastic fangs
- Red paint or markers (optional)
- LED candle
How-To Steps:
- Hollow and carve a face with a large mouth opening.
- Insert plastic fangs into the mouth.
- Add red paint details for dripping “blood.”
- Carve small triangles for angry eyebrows.
- Place a light inside for a creepy glow.
Day of the Dead Pumpkin
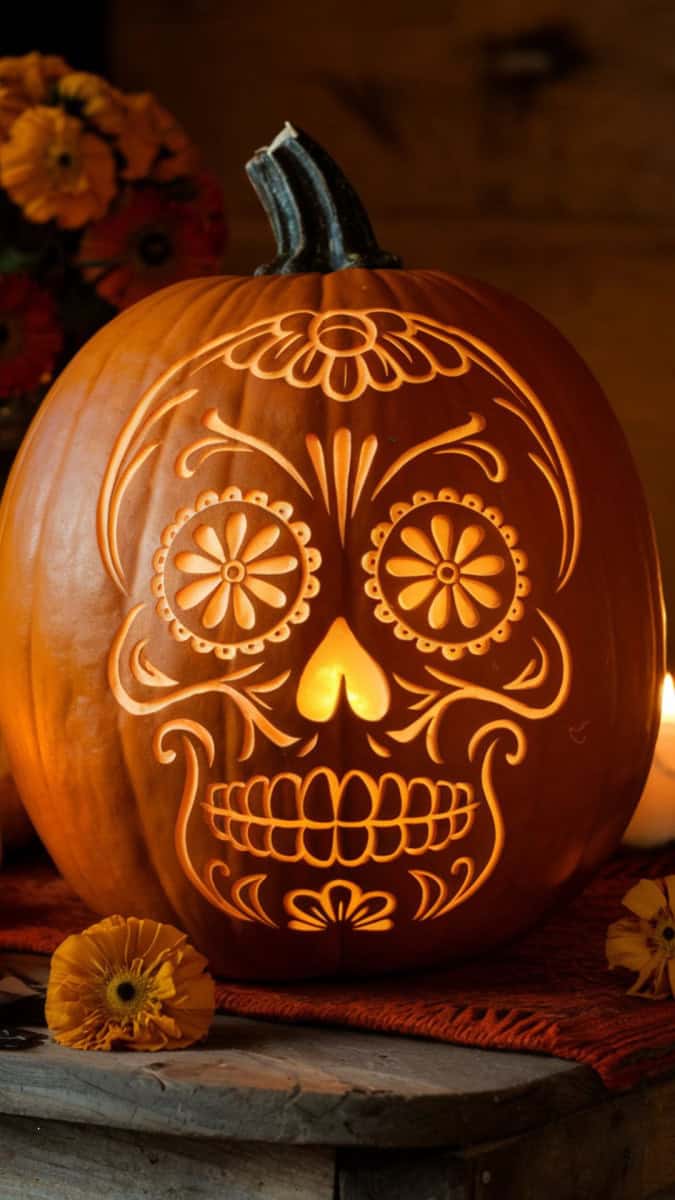
Celebrate the season in colorful style with a sugar skull–inspired carving. Painted details and floral accents turn your pumpkin into a vibrant centerpiece for Halloween or Día de los Muertos.
What You Might Need:
- Large pumpkin
- Carving tools for fine detail
- Sugar skull stencil or template
- LED candle
How-To Steps:
- Hollow and thin the pumpkin wall for easier carving.
- Trace the sugar skull pattern with flowers and swirls.
- Carve eyes as large circles with petal shapes around them.
- Add swirls, hearts, and cross shapes for detail.
- Light from within to highlight the intricate carving.
Ghostly Glow Pumpkin
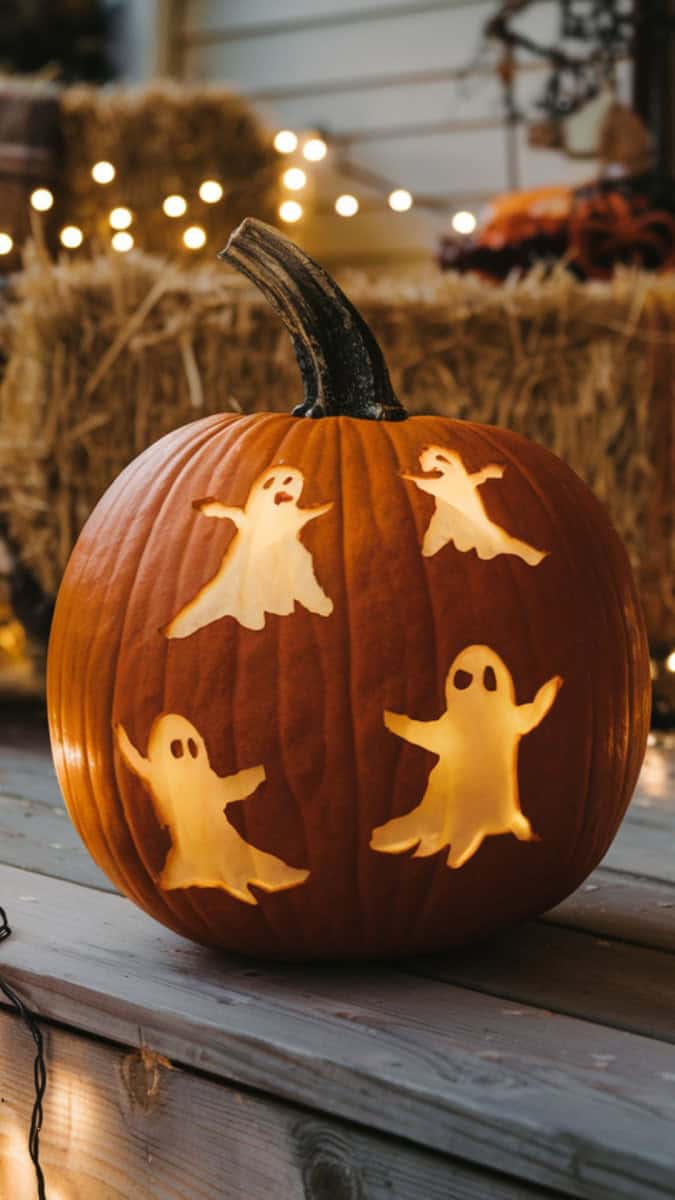
Keep things haunting yet cozy with ghost silhouettes carved into your pumpkin. When lit, the glowing spirits bring just the right mix of spooky and whimsical to your porch.
What You Might Need:
- Medium or large pumpkin
- Ghost stencil or simple sketch
- Carving knife set
- LED light
How-To Steps:
- Hollow the pumpkin and scrape thin for carving ease.
- Trace ghost outlines across the surface.
- Cut smooth curved shapes to create floating figures.
- Add small oval eyes to each ghost.
- Place a flickering LED inside for a glowing effect.
Decorating and Display
Transform your pumpkins into stunning decorations both inside and outside your home. From cozy indoor setups to creative outdoor displays, make your fall decor shine with these ideas.
Indoor Pumpkin Display Ideas

Create a warm, inviting atmosphere by using pumpkins as part of your indoor decor. Arrange small pumpkins on mantels, bookshelves, or coffee tables. Using a mix of differently-sized pumpkins can add visual interest. Consider painting pumpkins in colors that match your interior design.
Integrate vintage Halloween decorations for a nostalgic touch. You can also use pumpkins as centerpieces for your dining table. Hollow out a pumpkin and use it as a vase for autumn flowers or branches. Mixing pumpkins with candles or fairy lights can also add a magical glow to your indoor space.
Outdoor Pumpkin Decoration

Outdoor displays can really set the mood for your fall festivities. Carved pumpkins placed on your porch steps or alongside your walkway can welcome guests with a festive spirit. Use large pumpkins for a dramatic effect, and mix in smaller ones for variety.
If you’re looking for more unique ideas, try creating a pumpkin tower by stacking various-sized pumpkins. Use outdoor lights to illuminate your pumpkins at night, enhancing the Dekorasi Halloween feel.
For a cohesive look, incorporate vintage Halloween decorations outdoors, such as antique lanterns or aged signs, to complement your pumpkin displays.
Preservation Tips for Carved Pumpkins

To keep your carved pumpkins looking fresh for longer, follow these key tips. First, clean the inside thoroughly to remove as much pulp as possible. This helps prevent mold growth.
Applying a thin layer of petroleum jelly to the carved edges can keep them from drying out. Keeping your pumpkins in a cool, shaded area will also extend their lifespan. If your carved pumpkins start to shrivel, you can soak them in cold water for a few hours to rejuvenate their appearance.
Spraying your pumpkins with a mixture of water and bleach can help kill bacteria and prevent mold. These tips will ensure your intricate designs remain vibrant throughout the season.
Special Pumpkin Carving Themes

Explore unique themes to enhance your pumpkin carving experience. Whether you’re looking to celebrate Halloween in different cultural styles or create fun designs for less traditional holidays, these ideas will spark your creativity.


Halloween Celebration Around the World
Celebrate the spooky season with a global twist by trying out these diverse Halloween carving styles. In Mexico, the vivid decorations of Día de los Muertos can inspire intricate and colorful pumpkin carvings. Consider creating skull-shaped pumpkins adorned with bright colors and patterns.
In Italy, Halloween Pauroso encourages very eerie and frightful designs. Carve terrifying faces with sharp teeth and deep-set eyes to capture the essence of this celebration.
For a cheerful option, draw inspiration from Veselý Halloween, where pumpkins are carved into happy and whimsical expressions. This theme is perfect if you want to create a family-friendly display that brings smiles to everyone.
Summer and Alternative Holiday Pumpkins

Pumpkin carving isn’t just for October! Embrace the spirit of summer Halloween by crafting tropical-themed designs. Think about carving palm trees, beach scenes, or even sun-wearing sunglasses into your pumpkins.
For an alternative spin, consider pumpkins decorated for holidays like Christmas or Easter. Imagine a pumpkin painted white and carved to mimic a snowman for a festive winter touch.
During Easter, carve intricate patterns and pastel colors into your pumpkins, similar to decorated eggs. These alternative themes can keep your carving skills sharp and bring a touch of seasonal fun year-round.
DIY Halloween Craft Ideas

Engage in fun and creative projects this Halloween. Use the entire pumpkin to its fullest potential and transform household items into spooky decorations, bringing seasonal flair to your home.
Crafting with Leftover Pumpkin Pieces
After scooping out your pumpkin for carving, don’t discard the leftover pieces. You can create pumpkin seed necklaces by drying and painting the seeds. String them together for a festive accessory.
Another idea is to make pumpkin spice sachets. Dry out leftover pumpkin meat and mix it with cinnamon, cloves, and nutmeg. Place the mix in small fabric bags to spread a lovely autumn scent around your house.
For a tasty treat, roast the seeds with your favorite spices for a crunchy snack. These crafts make the most of your pumpkin and add a personal touch to Halloween festivities.
Halloween Decor Crafts
Transform everyday items into spooky decorations. Use black spray paint to create eerie bottle ghosts. Just paint old glass bottles black and add ghostly faces with white paint.
Try making a cobweb tablecloth using cheesecloth. Drape the cheesecloth over your table and stretch it to form cobweb shapes. Adding plastic spiders can enhance the eerie effect.
Create spooky candle holders from empty cans. Poke holes in them to form ghost faces, then place candles inside for a haunting glow. These crafts bring Halloween spirit into your home without much expense.
Link up these activities with other fun projects for a fully themed Halloween celebration. Explore various other DIY options to suit your style and home décor preferences.
Learn more about the different types of Pumpkins, what Cinderella Pumpkins are, and their best uses.
Do not waste your pumpkins – check out my article white pumpkin uses for what you can do with your leftover gourds!
Pumpkin Carving Inspiration


One-Pot Cooking Rocks!

Michelle
Hi, I’m Michelle, the founder, owner, author, and editor of OvenSpot. My passion for one-pot cooking commenced when I was working to prepare cafeteria lunches for school students. I am now on a mission to assist you in choosing the cooking pot or appliance you will use daily. As well as in-depth information to assist you in using and caring for your cookware and appliances. Along with the yummy recipes I use at home.
Questions? Reach out to Michelle at [email protected]