Easy Spicy Tuna Sushi Roll Recipe: Better Than Takeout!
If you’ve ever paid for a spicy tuna sushi roll and thought, “I wish I could make this at home,” you’re in the right place. This is one of my favorite “fun dinner” recipes because it feels like a treat, but it’s totally doable in your own kitchen, no fancy skills required. The filling is creamy, a little fiery, and super satisfying, and once you get the rolling down, it turns into a family activity (yes, even picky eaters love helping build their own rolls!).

Why You’ll Love These Spicy Tuna Sushi Rolls
This spicy tuna sushi roll hits that perfect balance of creamy, savory, and spicy, plus you can customize it for every eater at the table. It’s also a surprisingly budget-friendly way to do “sushi night” at home. Spicy tuna rolls became especially popular in the U.S. as sushi culture grew, and they’re now a classic because the spicy mayo-style sauce makes the tuna extra approachable for beginners.
Simple Ingredients
You don’t need a mile-long list, just a few staples that work together beautifully.
- Sushi rice: This is what gives the roll that classic, slightly sticky texture that holds everything together.
- Rice vinegar: Adds that signature sushi rice tang and keeps it tasting fresh.
- Sugar: Balances the vinegar and rounds out the rice seasoning.
- Salt: Brings out the flavor in the rice and filling.
- Sushi-grade tuna: The star of the show chooses high-quality fish meant for raw consumption.
- Japanese mayonnaise: Extra creamy and rich, making the filling taste like your favorite sushi spot.
- Sriracha: Adds the spicy kick and that signature spicy tuna flavor.
- Soy sauce: A little goes into the tuna mixture for savory depth.
- Nori sheets: The seaweed wrap that holds the roll together and adds that sushi flavor.
- Cucumber: Crunchy and refreshing, perfect with the spicy filling.
- Avocado: Creamy and mild, great for balancing the heat.
- Sesame seeds: Optional, but they add a nutty finish and make the rolls look gorgeous.
Servings and Timing
Servings: 4 rolls (about 24–32 pieces depending on slicing)
Preparation time: 25 minutes
Cook time: 20 minutes (rice)
Total time: 45 minutes
Recommended Equipment
Rice cooker or saucepan with lid
Fine mesh strainer
Mixing bowls
Sharp knife
Cutting board
Bamboo sushi rolling mat (makisu)
Plastic wrap (helps keep rice from sticking)
Small bowl of water (for wetting hands)
Measuring cups and spoons
Spatula or rice paddle
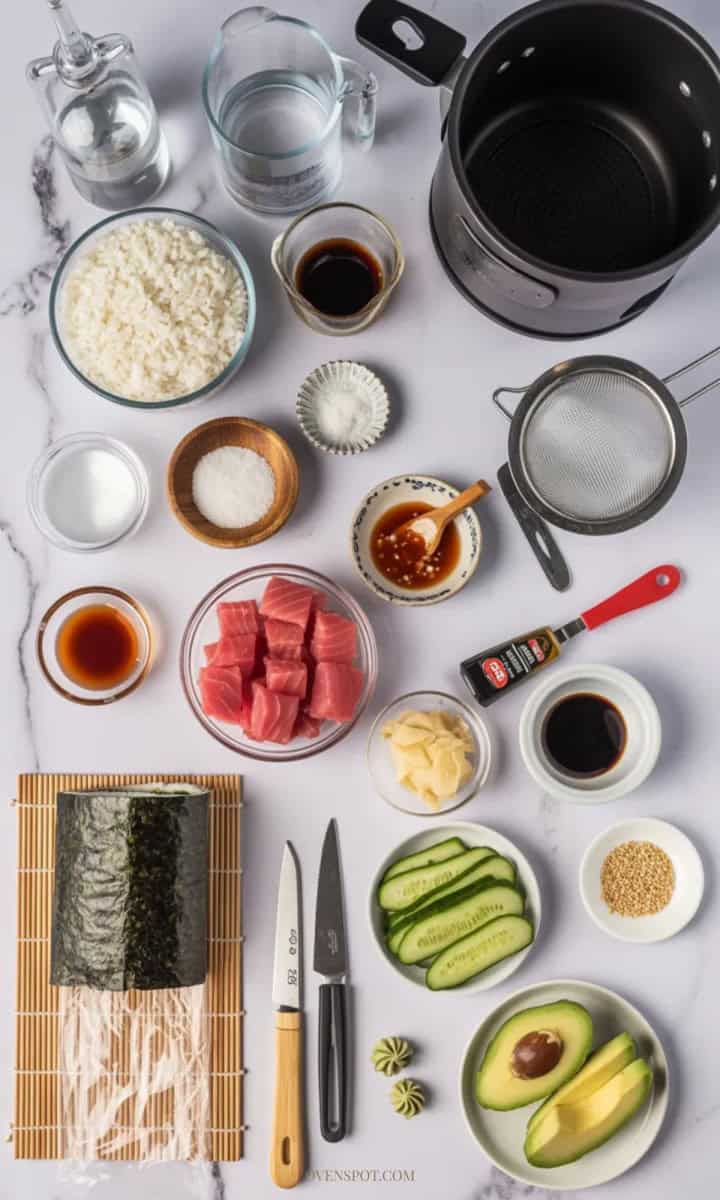
What is Needed
- 2 cups sushi rice
- 2 1/2 cups water (for cooking rice)
- 1/3 cup rice vinegar
- 2 tablespoons sugar
- 1 teaspoon salt
- 8 ounces sushi-grade tuna, diced
- 1/4 cup Japanese mayonnaise
- 1 1/2 tablespoons sriracha (adjust to taste)
- 1 teaspoon soy sauce
- 4 nori sheets
- 1 small cucumber, cut into thin matchsticks
- 1 large avocado, sliced
- 2 tablespoons sesame seeds (optional)
- Soy sauce, pickled ginger, and wasabi (optional, for serving), as needed
Instructions
- Place sushi rice in a fine mesh strainer and rinse under cool water until the water runs mostly clear.
- Cook in a rice cooker or simmer on the stovetop with the measured water, covered, until tender. Let it rest for 10 minutes.
- Warm the rice vinegar, sugar, and salt just until dissolved (microwave or small pan). Fold into the warm rice gently. Let rice cool until just warm (not hot).
- In a bowl, mix diced sushi-grade tuna, Japanese mayonnaise, sriracha, and soy sauce. Taste and adjust spice.
- Wrap your sushi mat in plastic wrap. Set out a small bowl of water for your hands. Slice the cucumber and avocado.
- Place 1 nori sheet shiny-side down on the mat. Wet hands and spread a thin, even layer of rice across the nori, leaving about 1 inch clear at the top edge.
- Lay the cucumber and avocado in a line across the lower third. Spoon spicy tuna in a neat line (don’t overfill).
- Lift the mat edge and roll tightly away from you, pressing gently to shape. Seal the edge with a dab of water.
- Optional topping: Sprinkle sesame seeds on the outside and gently press to adhere.
- Use a very sharp, slightly wet knife. Cut the roll in half, then into 6–8 pieces. Wipe the blade between cuts for clean slices.
- Plate with soy sauce, pickled ginger, and wasabi if you like.

What To Serve With This Recipe
- Miso soup
- Edamame with a sprinkle of sea salt
- Seaweed salad
- Cucumber salad with rice vinegar and sesame
- Steamed rice or simple veggie stir-fry for extra hungry kids
Top Tips
Keep a “water bowl” handy: Wet hands = rice won’t stick everywhere (and kids can help without frustration).
Don’t overfill: A little filling goes a long way. Overstuffed rolls are the #1 reason they fall apart.
Use a very sharp knife: A dull knife squishes the roll; wiping the blade between cuts makes it look restaurant-pretty.
Make it mild for kids: Mix part of the tuna with mayo only, then add sriracha to the adult portion.
Make-ahead shortcut: Mix the spicy tuna up to 6 hours ahead and keep chilled; cook rice earlier, but roll close to serving for best texture.
Recipe Variations
- Spicy salmon roll: Swap tuna for sushi-grade salmon.
- Cooked option: Use canned tuna (well-drained) or cooked shrimp for an easier, kid-friendly version.
- Tempura crunch: Add tempura flakes or crushed rice crackers for crunch.
- No avocado: Use cream cheese or extra cucumber instead.
- Inside-out roll (uramaki): Put rice on the outside and nori inside for a classic takeout look.
How to Store and Reheat
Storing: Sushi is best fresh, but you can wrap leftover rolls tightly in plastic wrap and refrigerate them up to 24 hours.
Reheating: Don’t reheat rice, as it gets hard, and fish shouldn’t be warmed. Instead, let chilled rolls sit at room temperature 10–15 minutes before eating (still keep food safety in mind).
If you like this recipe, check out my easy recipes for blackened fish taco bowls or shrimp tempura sushi bake!

Spicy Tuna Sushi Roll Recipe
Equipment
- Rice cooker or saucepan with lid
- Fine Mesh Strainer
- Mixing bowls
- Sharp knife
- Cutting board
- Bamboo sushi rolling mat (makisu)
- Plastic wrap
- Small bowl of water
- Measuring cups and spoons
- Spatula or rice paddle
Ingredients
- 2 cups sushi rice
- 2 1/2 cups water for cooking rice
- 1/3 cup rice vinegar
- 2 tablespoons sugar
- 1 teaspoon salt
- 8 ounces sushi-grade tuna diced
- 1/4 cup Japanese mayonnaise
- 1 1/2 tablespoons sriracha adjust to taste
- 1 teaspoon soy sauce
- 4 nori sheets
- 1 small cucumber cut into thin matchsticks
- 1 large avocado sliced
- 2 tablespoons sesame seeds optional
- Soy sauce pickled ginger, and wasabi (optional, for serving), as needed
Instructions
- Rinse the rice: Place sushi rice in a fine mesh strainer and rinse under cool water until the water runs mostly clear.
- Cook the rice: Cook in a rice cooker or simmer on the stovetop with the measured water, covered, until tender. Let it rest for 10 minutes.
- Season the rice: Warm the rice vinegar, sugar, and salt just until dissolved (microwave or small pan). Fold into the warm rice gently. Let rice cool until just warm (not hot).
- Make the spicy tuna: In a bowl, mix diced sushi-grade tuna, Japanese mayonnaise, sriracha, and soy sauce. Taste and adjust spice.
- Prep your station: Wrap your sushi mat in plastic wrap. Set out a small bowl of water for your hands. Slice the cucumber and avocado.
- Assemble the roll: Place 1 nori sheet shiny-side down on the mat. Wet hands and spread a thin, even layer of rice across the nori, leaving about 1 inch clear at the top edge.
- Add filling: Lay the cucumber and avocado in a line across the lower third. Spoon spicy tuna in a neat line (don’t overfill).
- Roll it up: Lift the mat edge and roll tightly away from you, pressing gently to shape. Seal the edge with a dab of water.
- Optional topping: Sprinkle sesame seeds on the outside and gently press to adhere.
- Slice: Use a very sharp, slightly wet knife. Cut the roll in half, then into 6–8 pieces. Wipe the blade between cuts for clean slices.
- Serve: Plate with soy sauce, pickled ginger, and wasabi if you like.
Notes
- Use sushi-grade tuna from a trusted source for raw preparation.
- For kids or beginners, swap in canned tuna or cooked shrimp for a no-stress cooked option.
- Keep your knife slightly wet for clean slices and a prettier presentation.

Michelle
Hi, I’m Michelle, the founder, owner, author, and editor of OvenSpot. My passion for one-pot cooking commenced when I was working to prepare cafeteria lunches for school students. I am now on a mission to assist you in choosing the cooking pot or appliance you will use daily. As well as in-depth information to assist you in using and caring for your cookware and appliances. Along with the yummy recipes I use at home.
Questions? Reach out to Michelle at [email protected]