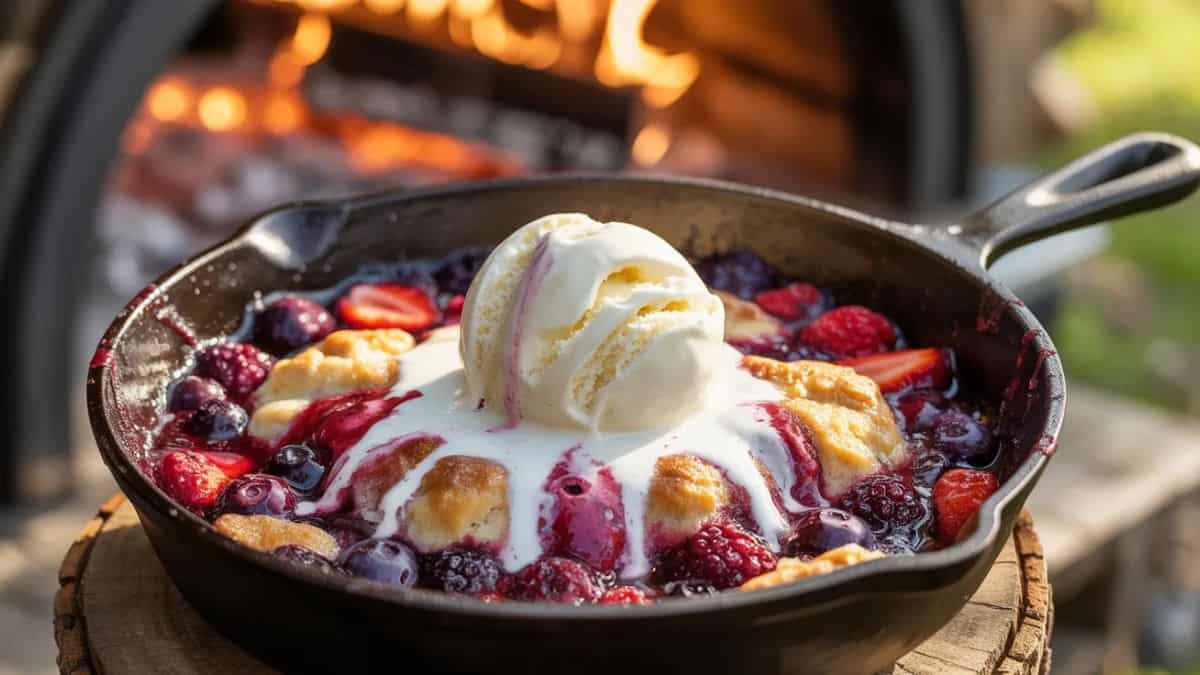
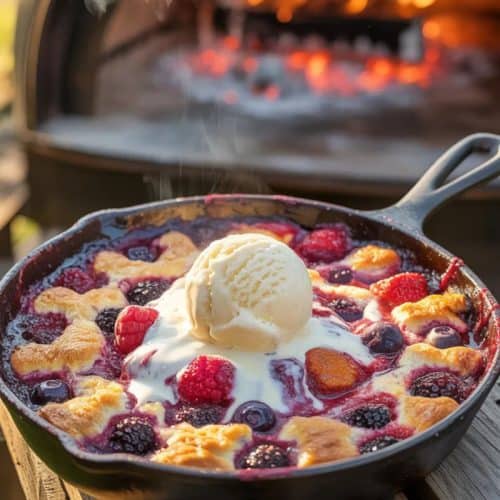
Cast Iron Skillet Berry Cobbler: Pizza Oven Style!
If you’ve never made dessert in your pizza oven, this cast iron skillet berry cobbler is the perfect way to start. It’s simple, delicious, and makes the most of that lingering oven heat after your pizza is done. Juicy berries bubble up into a syrupy filling while the cobbler topping turns crisp and golden. It’s rustic, unfussy, and always a hit specially with a scoop of ice cream on top. I’ve made this more times than I can count after pizza night and it never lasts long!
Why You’ll Love Cast Iron Skillet Berry Cobbler
You’ll love this recipe for how effortlessly it transforms humble ingredients into a comforting dessert. It’s baked right in the residual heat of your pizza oven, so it’s a smart way to use the oven after pizza night. Plus, the topping gets beautifully crisp and golden, while the berries bubble into a sweet, tangy jammy base. It’s one of those desserts that feels both easy and indulgent all at once.
Simple Ingredients
Just a handful of basic pantry and freezer items make this cobbler happen.
- Mixed berries: Fresh or frozen whatever you’ve got. Use a mix like blueberries, strawberries, raspberries, or blackberries.
- Granulated sugar: Sweetens the filling and the topping just enough to let the berries shine.
- Lemon juice: A little brightness to balance the sweetness and bring out the berry flavor.
- Cornstarch: Thickens the berry juices so you get that perfect syrupy texture.
- All-purpose flour: Forms the base of the cobbler topping.
- Baking powder: Gives the topping a bit of lift so it’s not too dense.
- Salt: Just a pinch enhances all the other flavors.
- Unsalted butter: Cold and cubed this makes the topping crumbly and rich.
- Vanilla ice cream or whipped cream (optional): For serving, and totally worth it.
Servings and Time
- Servings: 6
- Prep Time: 10 minutes
- Cook Time: 30 minutes
- Total Time: 40 minutes
What is Needed
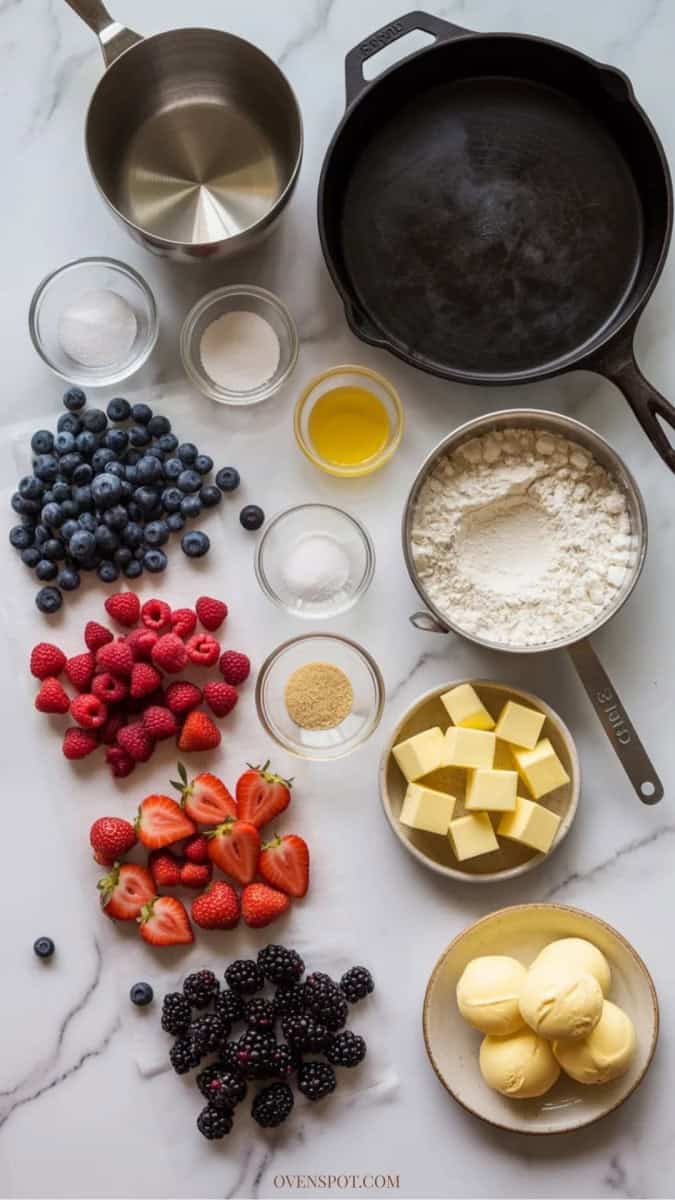
For the Berry Filling:
- 4 cups mixed berries (fresh or frozen; blueberries, raspberries, strawberries, or blackberries)
- ½ cup granulated sugar
- 2 teaspoons lemon juice
- 1 tablespoon cornstarch
For the Cobbler Topping:
- 1 cup all-purpose flour
- ⅓ cup granulated sugar
- 1 teaspoon baking powder
- ¼ teaspoon salt
- ¼ cup cold unsalted butter, cubed
For Serving (Optional):
- Vanilla ice cream or whipped cream
Instructions
- In a bowl, combine mixed berries, sugar, lemon juice, and cornstarch. Toss gently until everything is evenly coated.
- Pour the berry mixture into a 10–12 inch cast iron skillet and spread evenly.
- In another bowl, whisk together flour, sugar, baking powder, and salt. Cut in the cold butter using your fingers or a pastry cutter until the mixture looks like coarse crumbs.
- Sprinkle the topping over the berry mixture. Don’t press it down keeping it loose gives that perfect texture.
- Slide the skillet into a pizza oven at around 375–400°F (190–205°C). Bake for 25–30 minutes, rotating if needed, until the berries are bubbling and the top is golden brown.
- Let cool 5–10 minutes. Serve warm with vanilla ice cream or whipped cream.
Top Tips
- Use the oven’s residual heat – No need to preheat again! Bake this after your pizzas are done.
- Don’t press the topping – A loose topping crisps up better and gives you those golden crumbles.
- Frozen berries work great – No need to thaw; just mix and go.
- Add a splash of vanilla – Mix it into the berry filling for extra flavor.
- Let it cool a bit – The filling sets up better and won’t burn any mouths.
Recipe Variations
- Swap in peaches, cherries, or apples for a different fruit cobbler.
- Add a pinch of cinnamon to the topping for a cozy twist.
- Use brown sugar in place of white sugar for a deeper flavor.
Recommended Equipment
- 10–12 inch cast iron skillet
- Two mixing bowls
- Pastry cutter or your hands
- Measuring cups and spoons
Make Ahead Tips
You can mix the topping ahead and refrigerate it. Assemble and bake when ready.
How to Store and Reheat
- Store: Cover and refrigerate for up to 3 days.
- Reheat: Warm in a 300°F oven for 10–15 minutes or microwave individual servings for 30–45 seconds.
What to Serve With This Recipe
- A scoop of vanilla or cinnamon ice cream
- Fresh whipped cream
- Hot coffee or a dessert wine
What You Need to Know About This Recipe
Cobblers have long been a classic way to turn fruit into dessert with minimal fuss. Traditionally baked in ovens, this version adapts beautifully to the pizza oven’s high heat, giving you a bubbling, crisp-topped cobbler in no time. It’s especially handy because you bake it while the oven cools after pizza night. Less waste, more dessert!
Love Cooking in Your Pizza Oven?
If you’re just starting to explore what your pizza oven can really do, you’ll love these ideas! From appetizers to desserts like this berry cobbler, there’s so much more to make beyond pizza. Check out my collection of Pizza Oven Recipes for more inspiration!
Cast Iron Skillet Berry Cobbler
Equipment
- 10–12 inch cast iron skillet
- Two mixing bowls
- Pastry cutter or your hands
- Measuring cups and spoons
Ingredients
- 4 cups mixed berries fresh or frozen; blueberries, raspberries, strawberries, or blackberries
- ½ cup granulated sugar
- 2 teaspoons lemon juice
- 1 tablespoon cornstarch
- 1 cup all-purpose flour
- ⅓ cup granulated sugar
- 1 teaspoon baking powder
- ¼ teaspoon salt
- ¼ cup cold unsalted butter cubed
Instructions
- Prep the berries: In a bowl, combine mixed berries, sugar, lemon juice, and cornstarch. Toss gently until everything is evenly coated.
- Add to skillet: Pour the berry mixture into a 10–12 inch cast iron skillet and spread evenly.
- Make the topping: In another bowl, whisk together flour, sugar, baking powder, and salt. Cut in the cold butter using your fingers or a pastry cutter until the mixture looks like coarse crumbs.
- Top the berries: Sprinkle the topping over the berry mixture. Don’t press it down keeping it loose gives that perfect texture.
- Bake: Slide the skillet into a pizza oven at around 375–400°F (190–205°C). Bake for 25–30 minutes, rotating if needed, until the berries are bubbling and the top is golden brown.
- Serve: Let cool 5–10 minutes. Serve warm with vanilla ice cream or whipped cream.
Notes
- Frozen berries don’t need to be thawed
- Use the oven’s residual heat to bake without additional fuel

Michelle
Hi, I’m Michelle, the founder, owner, author, and editor of OvenSpot. My passion for one-pot cooking commenced when I was working to prepare cafeteria lunches for school students. I am now on a mission to assist you in choosing the cooking pot or appliance you will use daily. As well as in-depth information to assist you in using and caring for your cookware and appliances. Along with the yummy recipes I use at home.
Questions? Reach out to Michelle at [email protected]