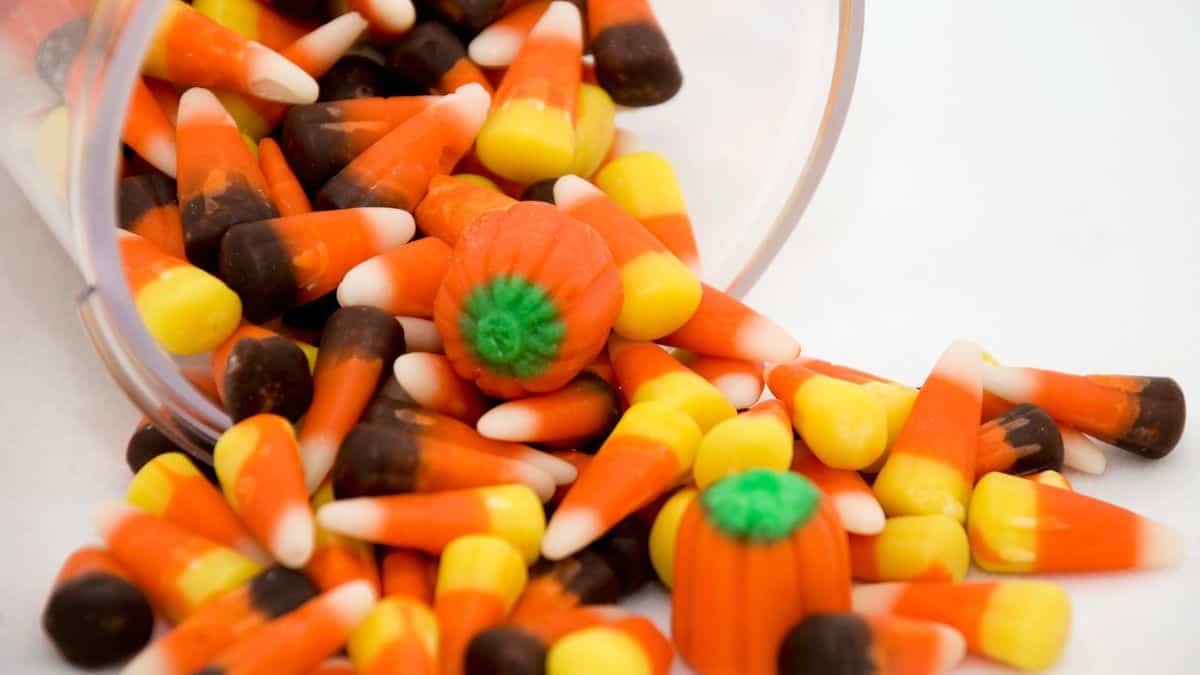
What to Do With Leftover Candy Corn: Ideas and Recipes
When October comes to a close, you might find an excess of candy corn from various Halloween festivities. While these sugary morsels are a popular seasonal treat, it’s easy to become overwhelmed by the abundance of leftover candy corn at the end of a season.
But leftover Halloween candy corn is nothing to fear. There are numerous creative and delicious ways to put that leftover candy corn to good use.
Leftover Candy Corn Recipes
This list of unique yet delicious recipes will inspire you to make homemade treats that will use leftover
Candy Corn in Baking
Are you feeling adventurous with your leftover candy? Baking is an excellent way to put those colorful treats to good use. Incorporate candy corn into your favorite recipes to create delightful baked goods that everyone will love.
1. Candy Corn Cookies
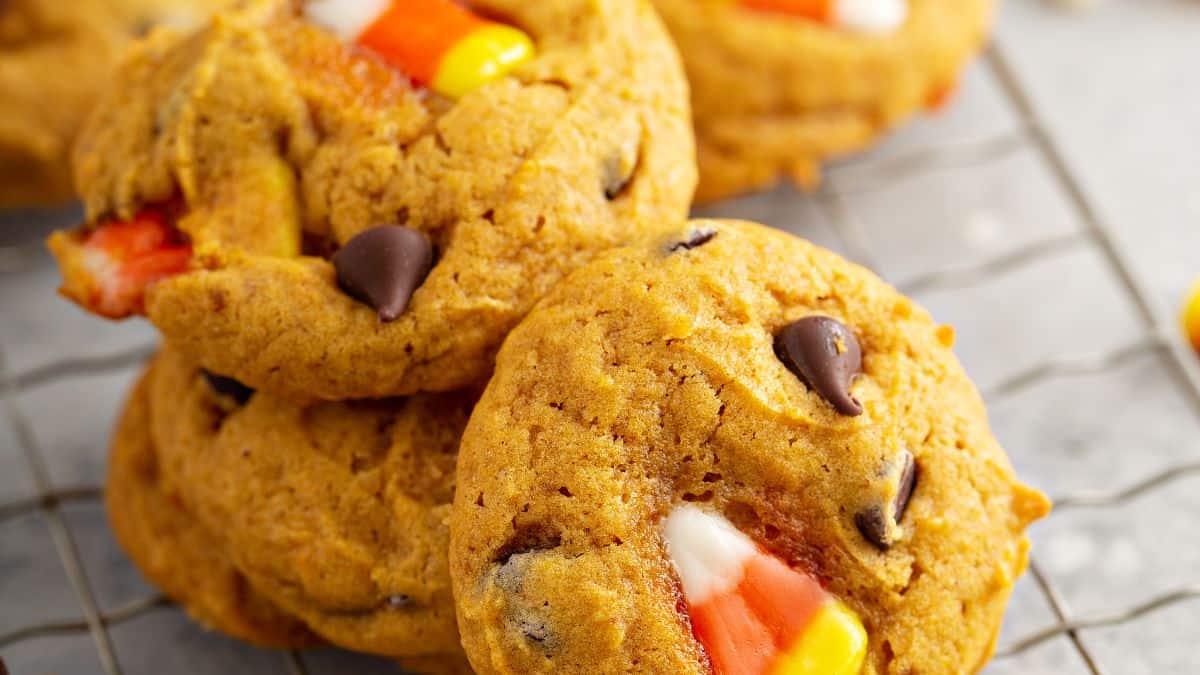
Transform timeless sugar cookies into a seasonal delight by adding crushed candy corn to the dough. Press them onto the cookie tops before baking for a festive look. The best part is that the corn decor is great for Thanksgiving, too.
Simple Ingredients
Let’s take a quick look at what goes into these fun fall cookies:
- All-purpose flour: This gives the cookies structure and keeps them soft and tender.
- Baking powder & baking soda: A blend of both helps create that perfect chewy texture with just a bit of lift.
- Salt: Enhances the overall flavor and balances the sweetness.
- Unsalted butter: Softened butter creates a rich, melt-in-your-mouth cookie base.
- Granulated sugar: Sweetens the dough and gives the cookies their classic cookie texture.
- Egg: Helps bind everything together and adds richness.
- Vanilla extract: Rounds out the flavor and complements the candy corn.
- Milk: Adds moisture to keep the cookies soft.
- Candy corn: The star of the show! Roughly chopped for mixing in, plus extra for decorating the tops.
These candy corn cookies are soft, chewy, and packed with festive fall flavor. Perfect for Halloween parties or afternoon baking with the kids. Get the full recipe for my candy corn cookies right here on OvenSpot!
2. Candy Corn Brownies
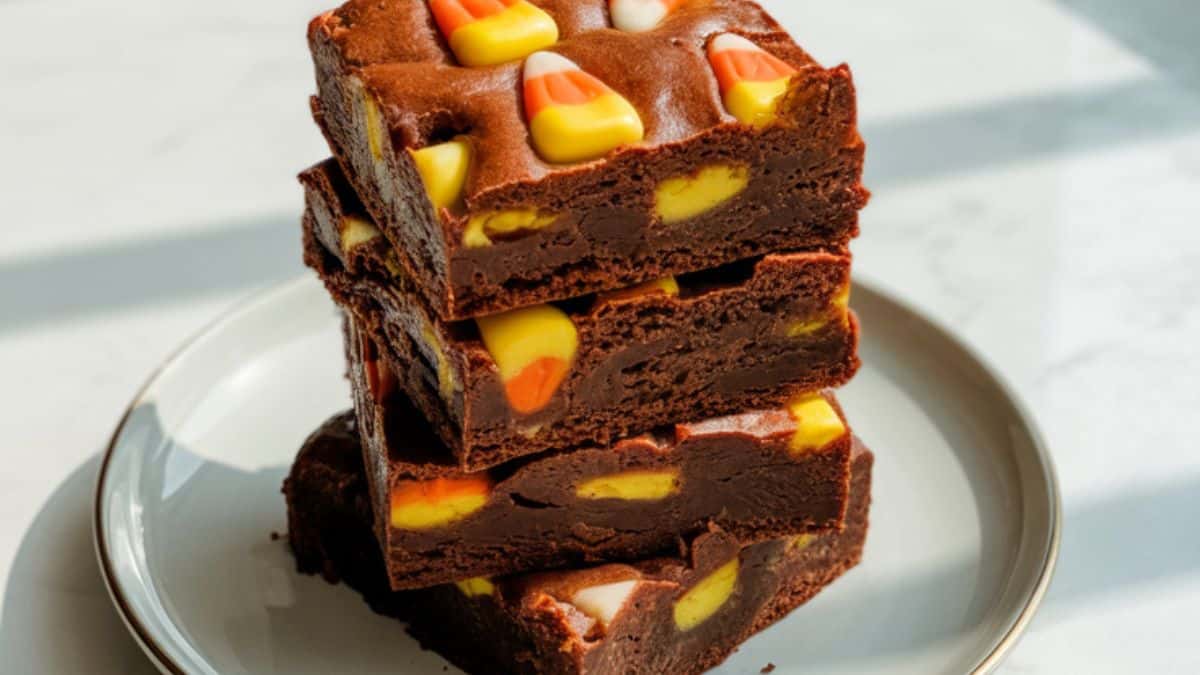
Mix chopped candy corn into your brownie batter for a sweet surprise, bake as usual, and enjoy the caramel pockets it creates within the chocolatey treat.
Simple Ingredients
Here’s what makes these brownies so rich and irresistible:
- Unsalted butter: Gives the brownies their moist, fudgy texture and buttery flavor.
- Granulated sugar: Sweetens the batter and helps create a shiny, crinkly brownie top.
- Vanilla extract: Enhances the chocolate and adds warmth to the flavor.
- Eggs: Provide structure and richness to the brownies.
- All-purpose flour: Gives just enough structure to hold everything together.
- Unsweetened cocoa powder: The source of all that deep, chocolate flavor.
- Salt: Balances the sweetness and deepens the chocolate taste.
- Candy corn: Chopped up and folded in adds chewy caramel pockets of sweetness.
- Semi-sweet chocolate chips (optional): For even more melty, gooey chocolate goodness.
These candy corn brownies are a fun and festive twist on the classic dessert. With gooey chocolate and caramel-like candy corn inside, they’re the perfect Halloween treat! Get the full recipe for candy corn brownies right here on OvenSpot!
Notes
- For extra festivity, press a few whole candy corn pieces onto the top of the batter just before baking.
- If you like gooier brownies, bake closer to 28 minutes; for firmer, go toward 32.
3. Candy Corn Bark
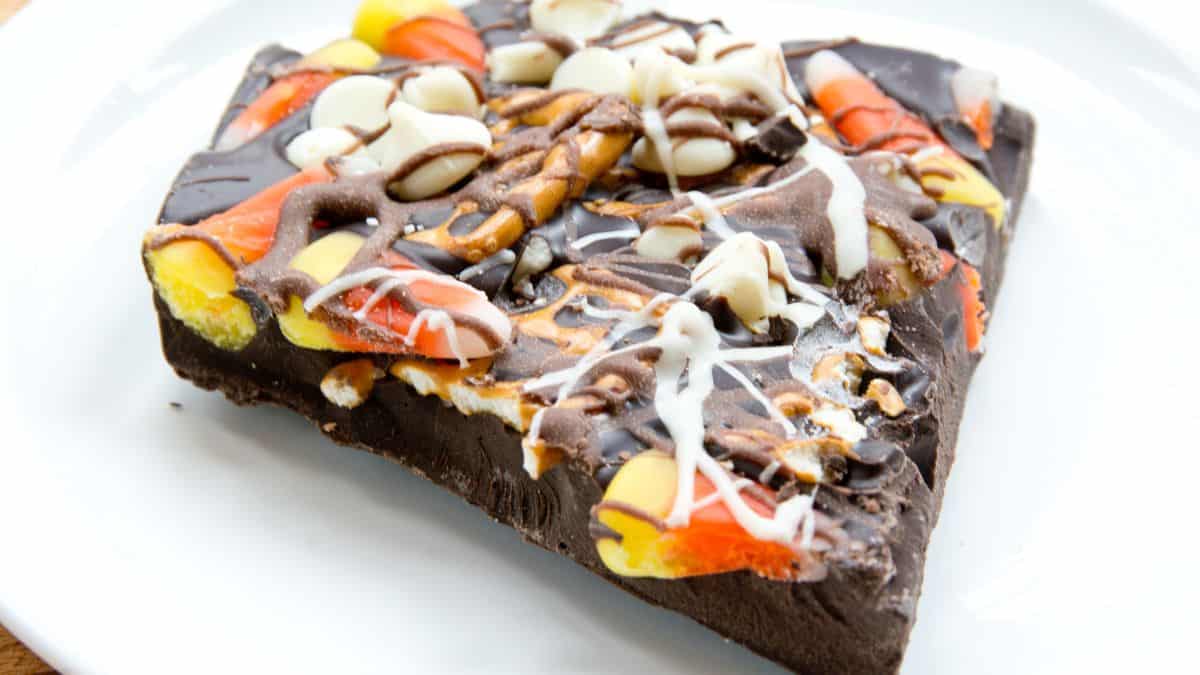
Melt your favorite chocolate and spread it onto a parchment-lined baking sheet. Scatter candy corn and other tasty mix-ins like nuts, pretzels, or dried fruit, and let it cool. Break the bark into pieces, and enjoy a delightful candy-loaded chocolate treat.
Simple Ingredients
Just a handful of everyday treats make this bark unforgettable:
- Semi-sweet or dark chocolate: Rich and smooth, this makes the base of the bark and balances the sweetness.
- White chocolate: A creamy top layer that adds contrast and sweetness while helping the toppings stick.
- Candy corn: The star of the show bright, chewy, and full of festive fall vibes.
- Pretzels: Adds crunch and just the right touch of salt to cut through the sweetness.
- Roasted salted peanuts (or almonds): Nutty, crunchy, and savory these make each bite more satisfying.
Looking for a fun and festive Halloween treat? This candy corn bark is loaded with sweet and salty goodness, from creamy chocolate to crunchy pretzels and colorful candy corn. Get the full recipe for candy corn bark right here on OvenSpot!
4. Peanut Butter Candy Corn Blondies
For all the peanut butter lovers out there, try incorporating leftover candy corn into your blondie recipe. The combination of peanut butter and candy corn creates rich and sweet bars.
Simple Ingredients
These pantry staples come together in the most delicious way.
- Creamy Peanut Butter: Adds richness and a chewy texture that’s irresistible in blondies.
- Unsalted Butter: Balances the sweetness and gives that buttery soft crumb.
- Light Brown Sugar: Creates depth of flavor and keeps the blondies moist.
- Granulated Sugar: Adds structure and sweetness to balance the peanut butter.
- Eggs: Provide structure and help hold everything together.
- Vanilla Extract: Rounds out the flavor and adds a warm, cozy aroma.
- All-Purpose Flour: The base that gives the bars their sturdy but soft texture.
- Baking Powder: A little lift keeps the blondies from being too dense.
- Salt: Just a pinch to enhance all the other flavors.
- Candy Corn: Melts into little caramelized pockets trust me, it works.
- Peanut Butter Chips or White Chocolate Chips (Optional): Adds extra creaminess and texture to each bite.
If you’re wondering what to do with leftover Halloween candy, these peanut butter candy corn blondies are your sweet solution. Rich, chewy, and surprisingly addictive!
Get the full recipe for peanut butter candy corn blondies right here on OvenSpot!
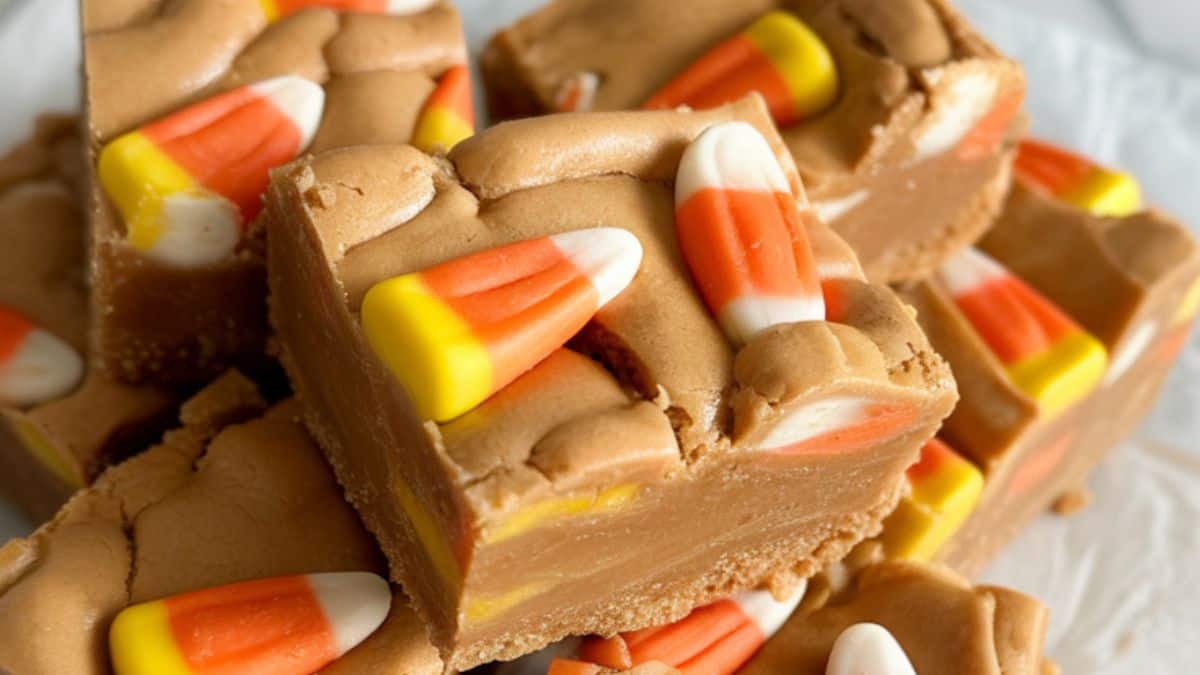
5. Candy Corn Fudge
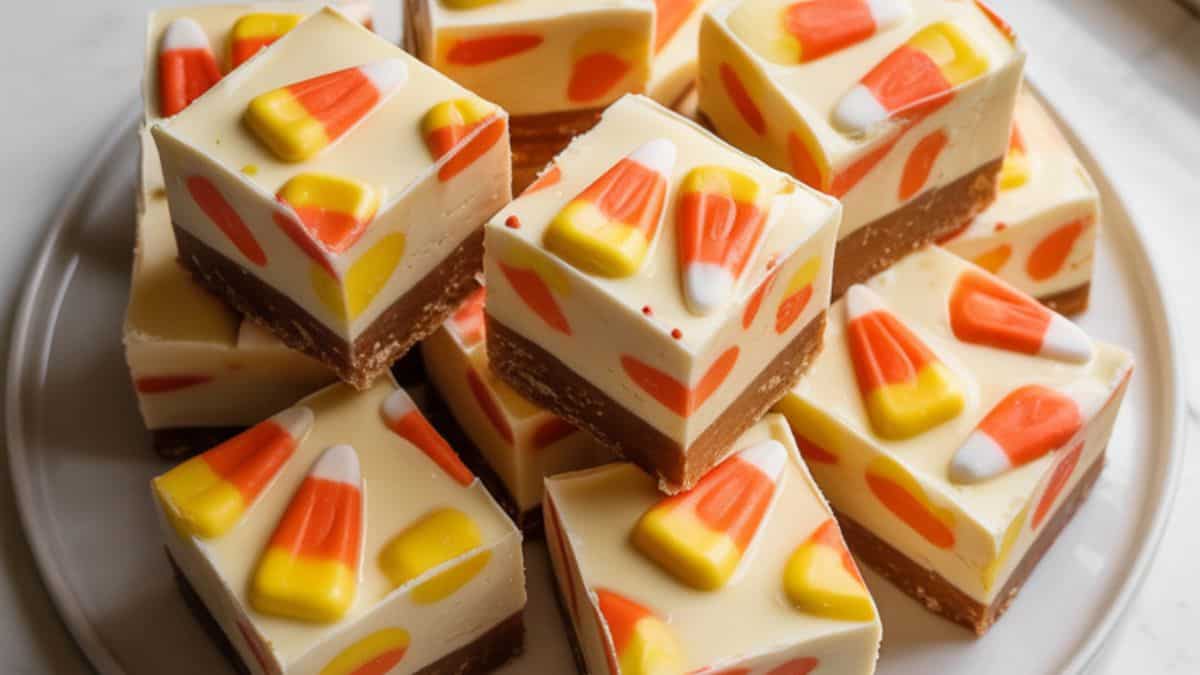
Fold candy corn into white chocolate fudge, let it set, and cut into squares for a festive and colorful twist on a classic dessert.
Simple Ingredients
Just a handful of pantry staples come together for this easy fudge!
- White Chocolate Chips: They melt into a creamy base and pair beautifully with the sweetness of candy corn.
- Sweetened Condensed Milk: This is the magic ingredient that makes the fudge smooth and sets perfectly every time.
- Unsalted Butter: Adds richness and a velvety texture to the fudge.
- Vanilla Extract: A little vanilla rounds out the sweetness and gives depth to the flavor.
- Candy Corn: Bright and festive, these chewy bites bring the Halloween spirit into every square.
- Festive Sprinkles or Extra Candy Corn (Optional): Adds a playful topping and extra crunch perfect for parties or gifting!
If you’re looking for a quick, festive treat, this candy corn fudge comes together with just a few ingredients and is a total crowd-pleaser! Get the full recipe for candy corn fudge right here on OvenSpot!
Check out my Christmas dessert charcuterie board!
6. Chocolate Candy Corn Cupcakes
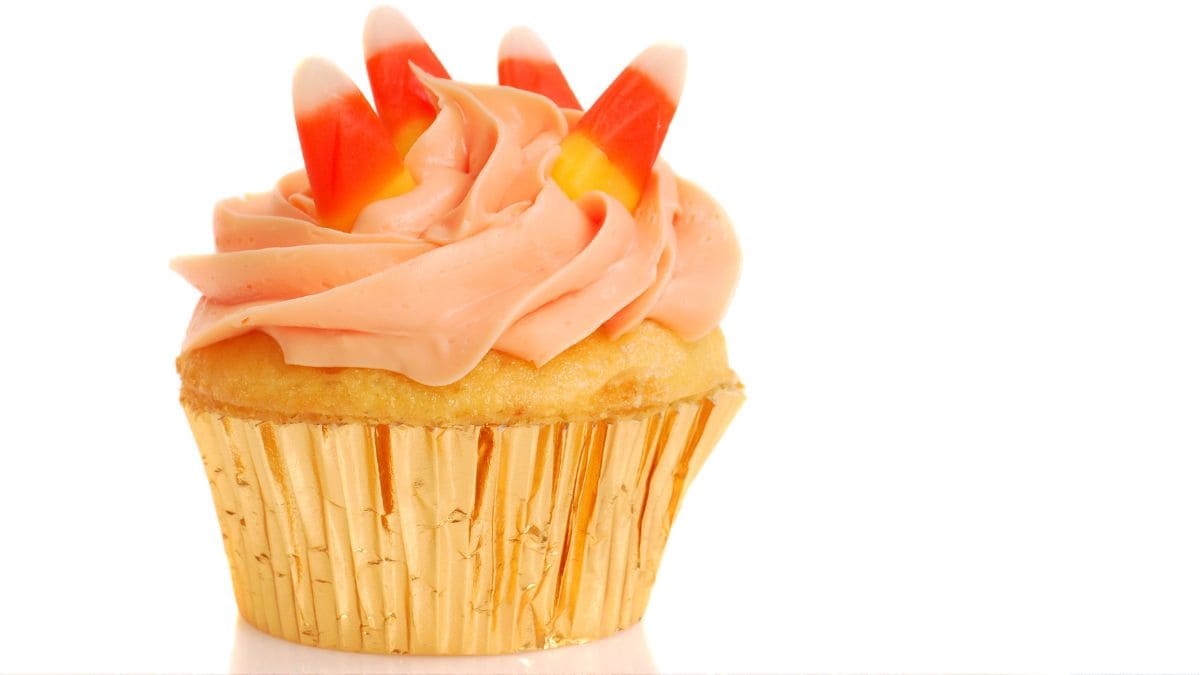
Elevate your classic chocolate cupcakes by adding a generous handful of candy corn. As the candy corn melts during baking, you’ll be left with gooey surprises in your cupcakes.
Remember, when using candy corn in baking, it’s essential to keep an eye on the cooking time, as the sugar in the candy may cause quicker browning or melting.
Simple Ingredients
These pantry staples make magic happen with just a little color and creativity!
- Candy Corns (for topping): The final touch that makes these cupcakes unmistakably Halloween!
- All-Purpose Flour: Provides the structure for the cupcakes so they hold their shape when layered and baked.
- Baking Powder: Helps the cupcakes rise and stay fluffy.
- Salt: Enhances the sweetness and balances the flavors.
- Unsalted Butter: Gives the cupcakes that rich, buttery flavor.
- Granulated Sugar: Adds sweetness and helps the cupcakes brown slightly on top.
- Eggs: Binds everything together and helps with that soft texture.
- Vanilla Extract: Brings in that comforting vanilla flavor everyone loves.
- Milk: Keeps the cupcakes moist and smooth.
- Yellow and Orange Gel Food Coloring: Used to create the candy corn layers bold, vibrant, and fun.
- Frosting (homemade or store-bought vanilla buttercream): Soft and creamy, it finishes these cupcakes with sweetness and style.
These candy corn vanilla cupcakes are perfect for Halloween with their festive tri-color layers and soft vanilla flavor. Get the full recipe for vanilla candy corn cupcakes right here on OvenSpot!
And don’t be afraid to get creative with your recipe. Mix and match various ingredients to combine with candy corn and discover new flavors in your baked goods.
Incorporating Candy Corn into Delicious Desserts
Along with its use as a seasonal baking staple, your leftover candy corn can make a tasty addition to various desserts.
7. Candy Corn Ice Cream
One simple and irresistible treat is candy corn ice cream. Fold some candy corn into softened vanilla ice cream, then refreeze it for a Halloween-themed dessert perfect for any time of year.
Ingredients
- 1 ½ cups (255 g) candy corn
- 1 cup (240 ml) heavy cream (for melting the candy corn)
- 2 cups (480 ml) heavy whipping cream (for whipping)
- 1 can (14 oz / 397 g) sweetened condensed milk
- 1 tsp vanilla extract
Instructions
- Melt candy corn: In a small saucepan, combine candy corn and 1 cup heavy cream. Cook over low heat, stirring often, until the candy corn fully melts into the cream (about 8–10 minutes). The cream will turn a vibrant orange. Remove from heat and let cool completely.
- Whip the cream: In a large mixing bowl, whip the remaining 2 cups of heavy whipping cream with a hand mixer or stand mixer until stiff peaks form.
- Combine base: In another bowl, whisk together the sweetened condensed milk, vanilla extract, and cooled candy corn cream until smooth.
- Fold together: Gently fold the whipped cream into the candy corn mixture, being careful not to deflate it.
- Freeze: Pour mixture into a loaf pan or freezer-safe container, smooth the top, and cover with plastic wrap or a lid. Freeze for at least 6 hours, or until firm.
- Serve: Scoop into bowls or cones. For extra fun, top with additional candy corn pieces or sprinkles.
Notes
- This is a no-churn recipe, so no ice cream machine is needed.
- If you prefer less sweetness, reduce the candy corn to 1 cup.
- Best enjoyed within 1–2 weeks for freshness.
8. Candy Corn Cake
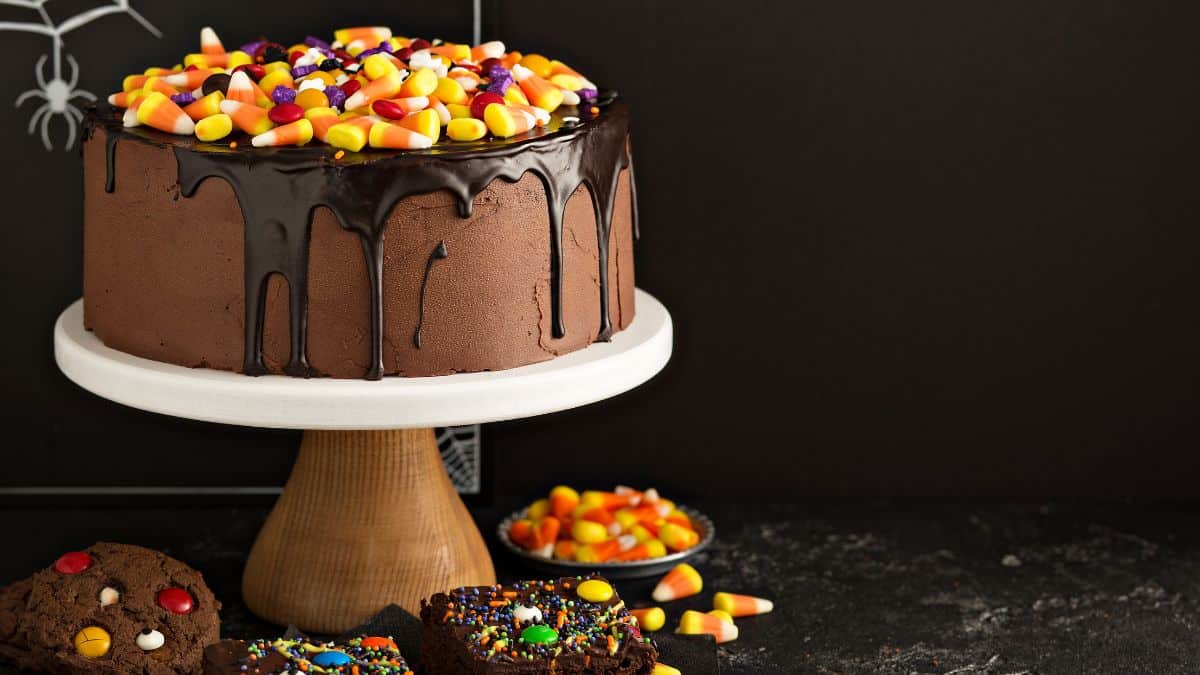
You can impress your guests with a colorful candy corn cake for fancier occasions. Create striking layers by mixing candy corn colors into separate batches of cake batter and baking them in separate cake pans.
Stack the different layers, cover them with a light frosting, and decorate with leftover candy corn. You’ll have a delicious cake that resembles candy corn and is accessorized with candy corn.
Simple Ingredients
Here’s what you’ll need for this delicious Halloween showstopper:
- All-purpose flour: Gives structure to the chocolate cake.
- Cocoa powder: For rich chocolate flavor use unsweetened!
- Baking powder and baking soda: Help the cake rise perfectly.
- Salt: Balances out the sweetness and deepens the chocolate flavor.
- Sugar: Both brown and white for moistness and sweetness.
- Eggs: Bind the cake and add richness.
- Buttermilk: Keeps the cake moist and tender with a slight tang.
- Vegetable oil: Ensures the cake stays soft and moist.
- Vanilla extract: Adds warmth and enhances the chocolate.
- Hot coffee or boiling water: Intensifies the cocoa flavor.
- Butter: Forms the base of the fluffy chocolate buttercream.
- Powdered sugar: Sweetens and thickens the frosting.
- Heavy cream: Helps whip the frosting and ganache to the perfect consistency.
- Semi-sweet chocolate chips: For a silky ganache drip.
- Candy corn and Halloween candies: For topping and decoration.
This decadent chocolate candy corn cake is the Halloween centerpiece your dessert table needs rich, chocolaty, and loaded with spooky fun! Get the full recipe for chocolate candy corn cake right here on OvenSpot!
9. Candy Corn Jello
For a playful dessert, whip up some candy corn Jello. Make layers of different flavors that match the candy corn colors, mix in some candy corn, and pour into a mold one color at a time, allowing each layer to set slightly between. Once set, you’ll have a candy-corn-colored candy corn Jello.
Ingredients
- 1 (3 oz / 85 g) box lemon Jello (yellow layer)
- 1 (3 oz / 85 g) box orange Jello (orange layer)
- 1 packet (about 2 ½ tsp) unflavored gelatin
- 1 cup (240 ml) cold water
- 2 cups (480 ml) boiling water (divided)
- 1 cup (240 ml) sweetened condensed milk (for the white layer)
- Whipped cream, for topping
- Candy corn, for garnish
Instructions
Yellow Layer
- Dissolve lemon Jello in 1 cup boiling water.
- Add ½ cup cold water and stir until combined.
- Pour into clear cups or a 9×13-inch glass dish. Refrigerate for 30–40 minutes, or until set but not firm.
Orange Layer
- Dissolve orange Jello in 1 cup boiling water.
- Add ½ cup cold water and stir until combined.
- Gently pour over the yellow layer. Refrigerate another 30–40 minutes until set.
White Layer
- In a small bowl, sprinkle unflavored gelatin over ½ cup cold water; let bloom for 5 minutes.
- Add ½ cup boiling water and stir until gelatin dissolves.
- Stir in sweetened condensed milk until smooth.
- Let cool to room temperature, then gently pour over the orange layer.
- Chill for at least 2 hours, or until fully set.
Serve
- If using a large pan, cut into squares or triangles. If using cups, top directly.
- Finish with whipped cream and a few candy corn pieces for decoration.
Notes
- To avoid layers blending, make sure each layer is mostly set before pouring the next.
- Clear cups show off the candy corn effect beautifully.
- Can be made 1 day ahead; keep chilled until serving.
10. Candy Corn Rice Krispie Treats
Put a twist on a classic treat by adding candy corn to your rice krispie treats. Melt marshmallows with butter, stir in the cereal and candy corn, and press the mixture into a pan to set.
Ingredients
- 3 tbsp (45 g) unsalted butter
- 1 (10 oz / 283 g) bag mini marshmallows (about 6 cups)
- 6 cups (150 g) Rice Krispies cereal
- 1 ½ cups (240 g) candy corn
- Optional: ½ cup (90 g) white chocolate chips for drizzling
Instructions
- Prepare the pan: Grease or line a 9×13-inch baking pan with parchment paper.
- Melt butter and marshmallows: In a large pot over low heat, melt butter. Add marshmallows and stir until completely melted and smooth.
- Add cereal: Remove from heat and quickly stir in Rice Krispies until evenly coated.
- Mix in candy corn: Gently fold in candy corn (reserve a handful for topping).
- Press into pan: Spread mixture into the prepared pan. Use a greased spatula or wax paper to press it down evenly.
- Decorate: Sprinkle the reserved candy corn on top. If desired, melt white chocolate and drizzle over the top for extra flair.
- Cool & cut: Let cool completely, then cut into squares or fun shapes.
Notes
You can press the mixture into round molds or cookie cutters for themed shapes (like pumpkins or stars).
For extra gooey treats, reserve 1 cup of mini marshmallows and fold them in with the candy corn at the end.
Best eaten within 2–3 days. Store covered at room temperature.
Using Candy Corn in Unique Dishes
Haven’t found just the right candy corn recipe for you yet? Let’s get quirky.
11. Candy Corn Popcorn
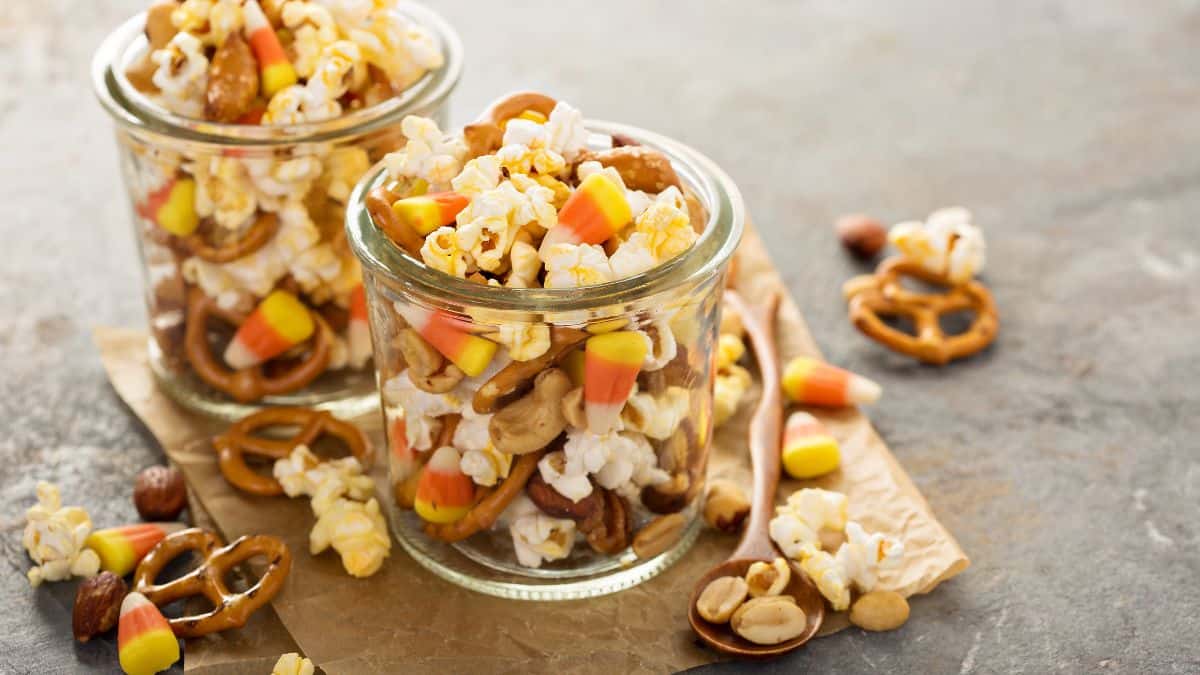
Create a twist on traditional popcorn by making candy corn popcorn. Melt the candy corn, drizzle it over freshly popped popcorn, and toss until evenly coated. If you have time, roll them into popcorn balls for an easy-to-pick-up snack. Enjoy a sweet and salty snack that’s perfect for Halloween movie nights.
Ingredients
- 10 cups (about 80 g) plain popped popcorn (about ½ cup unpopped kernels)
- 2 cups (320 g) candy corn
- 1 cup (200 g) granulated sugar
- ½ cup (120 ml) light corn syrup
- ½ cup (115 g) unsalted butter
- ½ tsp salt
- 1 tsp vanilla extract
- Optional: 1 cup (170 g) white chocolate chips or pretzels for extra crunch
Instructions
- Prepare popcorn: Pop popcorn and place it in a large mixing bowl. Remove any unpopped kernels. Add candy corn and optional pretzels if using.
- Cook coating: In a saucepan over medium heat, combine sugar, corn syrup, butter, and salt. Stir constantly until mixture comes to a boil. Continue boiling (without stirring) for 4–5 minutes, until the syrup reaches 240°F (soft-ball stage).
- Flavor: Remove from heat and stir in vanilla extract.
- Coat popcorn: Carefully pour hot syrup over the popcorn mixture. Toss quickly with a greased spatula until evenly coated.
- Cool: Spread coated popcorn on a parchment-lined baking sheet. Allow to cool completely before breaking apart.
- Optional popcorn balls: While mixture is still warm, grease your hands and form into popcorn balls. Wrap individually in plastic wrap for parties or gifting.
Notes
- Store in an airtight container at room temperature for up to 5 days.
- For a festive look, drizzle melted white chocolate over cooled popcorn and sprinkle with seasonal sprinkles.
- Works great for Halloween movie nights or bagged up as party favors.
12. Candy Corn Pizza
If you’re feeling adventurous, try adding candy corn to your pizza. Before adding the cheese, sprinkle a thin layer of candy corn on your pizza toppings. The candy will be baked into the pizza, adding a sweet contrast to the savory flavors.
13. Butterfingers with Candy Corn
Make your candy corn butter by melting equal parts candy corn and peanut butter together. Spread this mixture on a sheet of wax paper and place another sheet on top. Roll out the mixture evenly and let it cool. Once set, cut into bars and get your homemade Butterfinger-inside-like candy bars.
14. Taffy and Lollipops
Melt candy corn to create a pliable, taffy mixture. You can shape this taffy into balls, twists, or even lollipops. Just stick a lollipop stick into the taffy while it’s still warm and let it harden around the stick.
15. Candy Corn-Infused Oreos
Give your Oreos a sweet and colorful update by mixing crushed candy corn into the cream filling. Just twist open an Oreo, add a pinch of crushed candy corn to the center, and press the cookie back together. Enjoy your upgraded sandwich cookie as a unique and festive treat.
16. Candy Corn Pudding Shots
Combine vanilla pudding with liquor, stir in chopped candy corn, chill in shot glasses, and serve with whipped cream for a fun, adult-friendly treat.
Candy Corn Drinks
Who says candy corn has to be eaten? These simple ideas take candy corn liquid.
17. Candy Corn Cocktails
If you’re looking for a more grown-up concoction, consider infusing vodka with candy corn for a unique and festive cocktail. It is easy to add candy corn to a jar of vodka and let it sit for a few hours. The vodka will take on the sweet and slightly nutty flavor of the candy corn, creating a one-of-a-kind drink to enjoy with friends.
18. Candy Corn Milkshake
One delicious way to use candy corn is to make a milkshake. Blend vanilla ice cream, milk, and a handful of candy corn pieces for a sweet and creamy treat. The candy corn adds a delightful flavor, and the vibrant colors make for a visually appealing dessert.
19. Candy Corn Hot Chocolate
Try creating a candy corn hot chocolate for a warm, genuinely seasonal beverage option. Melt a few pieces of candy corn in a saucepan with milk and chocolate chips. Once everything is melted and well combined, pour into a mug and top with whipped cream or marshmallows for a cozy drink perfect for a chilly autumn day.
Candy Corn Craft
20. Make Your Own Candy Corn Stained Glass!
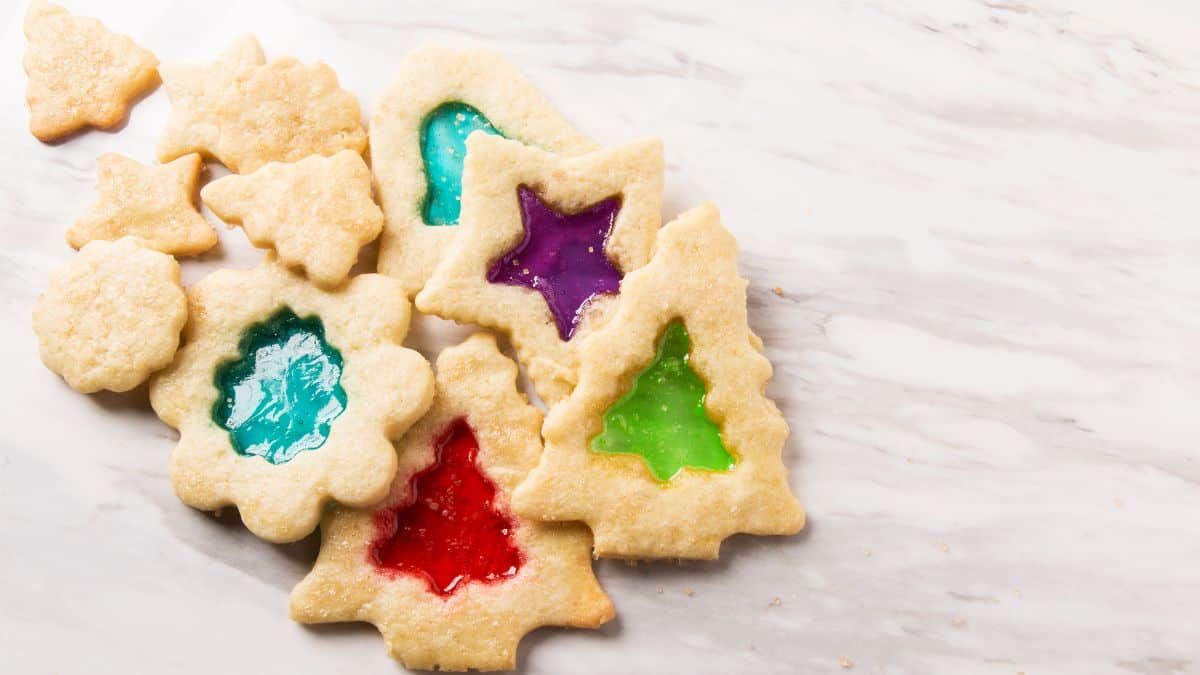
Want a fun and easy kitchen project? Try making stained glass out of leftover candy corn! Here’s how:
- Heat your oven to 300°F.
- Spread a few candy corns (about 18 pieces should do) on a parchment-lined baking tray or a silicone mat.
- Bake them for 15 minutes.
Watch as they melt into a gorgeous, stained glass-like sheet! Once it cools, it’ll crack just like real stained glass. Remember to handle it carefully. Enjoy your edible art!
Wrapping Up: Leftover Halloween Candy Recipe Ideas
With these recipes, your leftover candy corn will quickly transform from a post-Halloween nuisance to a coveted ingredient in your fall baking and treat-making repertoire. Enjoy the process of creating and sharing these sweet delights!
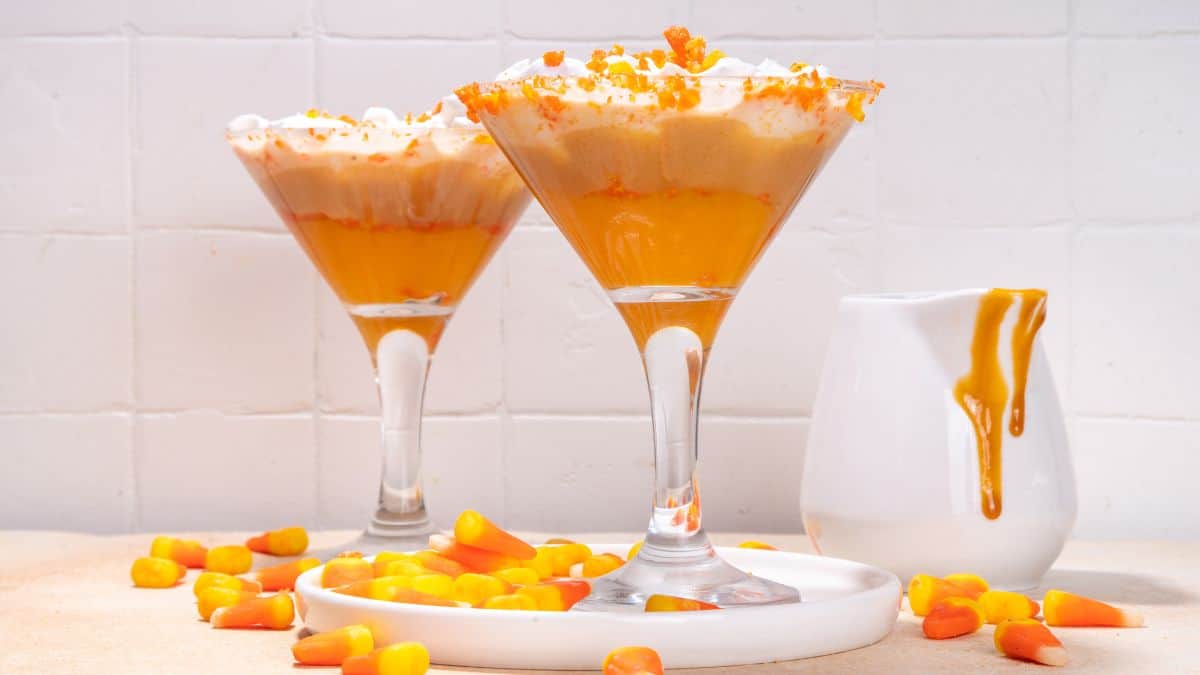
If you do not want more desserts and candy, why not make yourself a yummy candy corn martini and relax?
One-Pot Cooking Rocks!

Michelle
Hi, I’m Michelle, the founder, owner, author, and editor of OvenSpot. My passion for one-pot cooking commenced when I was working to prepare cafeteria lunches for school students. I am now on a mission to assist you in choosing the cooking pot or appliance you will use daily. As well as in-depth information to assist you in using and caring for your cookware and appliances. Along with the yummy recipes I use at home.
Questions? Reach out to Michelle at [email protected]