25+ Delectable Easter Dessert Recipes to Sweeten Your Celebration
Spring is in the air, the table is filling with pastel colors, and Easter is the perfect excuse to bake something truly special. Whether you’re hosting a full Easter brunch, planning a family lunch, or simply bringing dessert to share, this collection of Easter dessert recipes and ideas has something for every kind of celebration.
From showstopping carrot cakes and adorable bunny cupcakes to creamy no-bake mousses and bright, fruity spring tarts, these desserts capture everything we love about the season light flavors, cheerful colors, and just the right amount of sweetness.
Some recipes are traditional favorites that bring comfort and nostalgia. Others offer a fresh twist with tropical fruit, floral notes, or elegant presentation worthy of your holiday table. You’ll find kid-friendly treats, impressive centerpieces, simple make-ahead options, and bakery-style desserts you can easily create at home.
Chocolate Bunny Cake
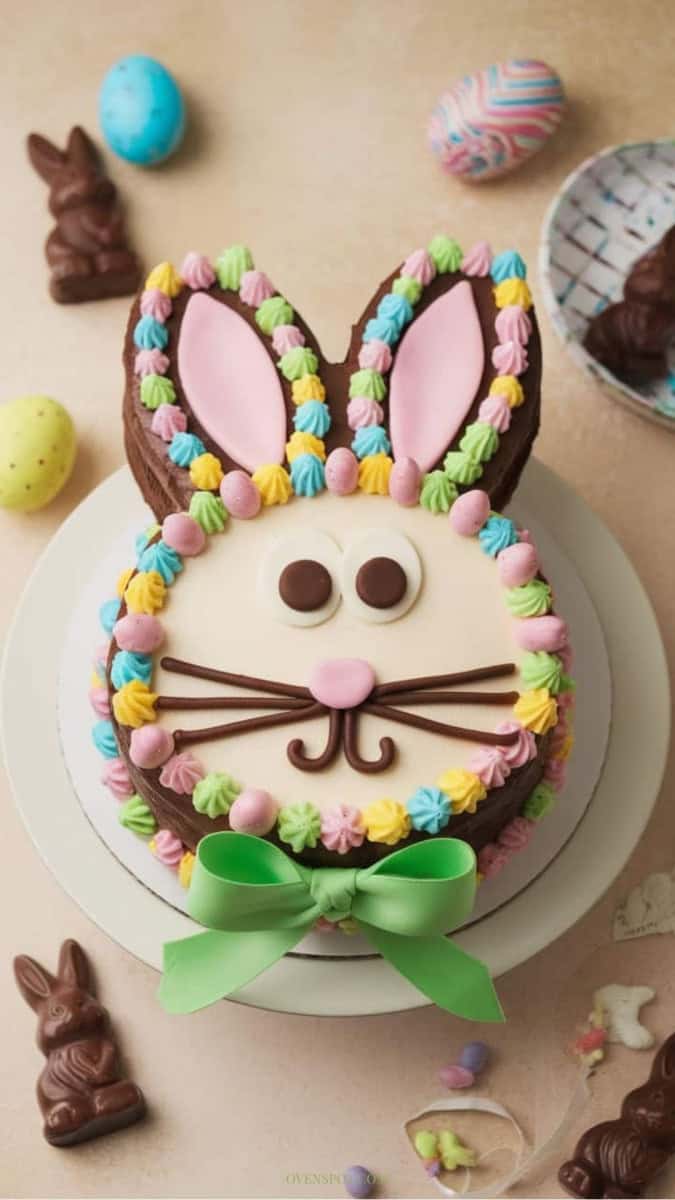
If you want a true showstopper for your Easter table, this chocolate bunny face cake is guaranteed to steal the spotlight. With rich chocolate cake layers, smooth frosting, pastel piping details, and playful bunny features, it’s festive, fun, and surprisingly simple to decorate.
This cake isn’t just dessert it’s the centerpiece.
Ingredients
For the Chocolate Cake
- 2 cups (250g) all-purpose flour
- ¾ cup (75g) unsweetened cocoa powder
- 2 cups (400g) granulated sugar
- 1 ½ teaspoons baking powder
- 1 ½ teaspoons baking soda
- 1 teaspoon salt
- 2 large eggs
- 1 cup (240ml) whole milk
- ½ cup (120ml) vegetable oil
- 2 teaspoons vanilla extract
- 1 cup (240ml) hot coffee or hot water
For the Frosting
- 1 cup (225g) unsalted butter, softened
- 3 ½ cups powdered sugar
- ½ cup cocoa powder
- 2–3 tablespoons milk
- 1 teaspoon vanilla extract
For Decorating
- White fondant (face base)
- Pink fondant (ears + nose)
- Brown fondant or chocolate (eyes + whiskers)
- Pastel buttercream (yellow, blue, green, pink)
- Mini candy eggs (optional)
- Ribbon for bow
Instructions
1. Bake the Cake
Preheat oven to 350°F (175°C).
Grease and line two 8-inch round cake pans.
In a large bowl, whisk together flour, cocoa powder, sugar, baking powder, baking soda, and salt.
Add eggs, milk, oil, and vanilla. Mix until smooth. Slowly stir in hot coffee (this deepens the chocolate flavor).
Divide batter evenly between pans.
Bake for 30–35 minutes, or until a toothpick inserted comes out clean.
Cool completely before assembling.
2. Make the Frosting
Beat butter until creamy.
Add powdered sugar, cocoa powder, vanilla, and milk. Beat until smooth and fluffy.
Adjust consistency if needed with a splash of milk.
3. Assemble the Bunny Shape
Stack and frost the two cake layers with chocolate frosting.
Use a small knife to slightly shape the top into gentle bunny-ear curves (or attach fondant ears without reshaping).
Cover the top center with rolled white fondant to create the bunny face.
4. Decorate
- Cut pink and white fondant for bunny ears and place on top.
- Add chocolate or fondant circles for eyes.
- Shape whiskers and mouth from brown fondant.
- Pipe pastel buttercream around the edge using a star tip.
- Add mini candy eggs for extra Easter detail.
- Tie a green ribbon around the base for a finishing touch.
Let it set slightly before slicing and prepare for compliments.
Chocolate Mousse Eggs

Chocolate mousse eggs are a rich sweet treat that captures the spirit of Easter in a rich and creamy way. These eggs are not only visually appealing but also offer a smooth, indulgent chocolate flavor that is perfect for satisfying any sweet tooth. Best of all, they are relatively easy to make, making them a great choice for baking with friends or family.
With their light texture and rich chocolate taste, chocolate mousse eggs can be enjoyed on their own or filled with various goodies like fruit or whipped cream. They make a lovely centerpiece for your Easter dessert table and are sure to impress everyone.
Ingredients
- 1 cup heavy cream
- 8 ounces dark chocolate, chopped
- 3 large eggs, separated
- 1/4 cup granulated sugar
- 1 teaspoon vanilla extract
- Pinch of salt
- Chocolate eggs molds
Instructions
- In a microwave-safe bowl, melt the chopped dark chocolate in 30-second increments, stirring until smooth. Allow it to cool slightly.
- In a separate bowl, whip the heavy cream until soft peaks form. Be careful not to overwhip.
- In another bowl, whisk the egg yolks with granulated sugar and vanilla extract until pale and fluffy.
- Gradually fold the cooled chocolate into the egg yolk mixture, then gently fold in the whipped cream until well combined.
- In a clean bowl, beat the egg whites with a pinch of salt until stiff peaks form. Carefully fold these into the chocolate mixture.
- Spoon the mousse into chocolate egg molds and refrigerate for at least 4 hours or until set.
- Once set, gently remove the mousse from the molds and serve chilled. You can garnish with whipped cream or fruit, if desired.
Chocolate-Covered Marshmallow Eggs

These chocolate-covered marshmallow eggs are the perfect sweet treat for Easter. With a soft, fluffy marshmallow center coated in smooth chocolate and finished with pastel drizzles, they look just as festive as they taste.
They’re fun to make, easy to customize, and beautiful enough to tuck into Easter baskets or display on your dessert table.
Ingredients
- 12 large marshmallows (or homemade marshmallow cut into egg shapes)
- 2 cups semi-sweet or milk chocolate chips
- 1 teaspoon coconut oil (optional, for smoother melting)
- ½ cup white chocolate (for pastel drizzle)
- Food coloring (pastel pink, blue, yellow, green)
- Mini candy eggs (optional for decorating)
Instructions
1. Prepare the Marshmallows
If using large marshmallows, gently shape them into egg forms by trimming slightly with a knife. Place them on a parchment-lined tray.
2. Melt the Chocolate
In a microwave-safe bowl, melt chocolate chips in 30-second intervals, stirring between each until smooth. Stir in coconut oil if using.
3. Coat the Eggs
Using a fork, dip each marshmallow into the melted chocolate, making sure it’s fully coated. Let excess chocolate drip off, then place back on parchment paper.
Allow to set at room temperature or refrigerate for 15–20 minutes.
4. Add the Pastel Drizzle
Melt white chocolate and divide into small bowls. Add a drop of pastel food coloring to each bowl. Spoon or pipe thin lines over the chocolate eggs for a decorative finish.
Let set completely before serving or packaging. They’re sweet, soft, and perfectly festive ideal for Easter baskets, party favors, or a cheerful spring dessert platter.
Chocolate Mousse Cups

Chocolate mousse cups are a treat that perfectly balance rich chocolate flavor with a light, airy texture. They are smooth, creamy, and just sweet enough to satisfy your dessert cravings without being overwhelming. This simple recipe is perfect for any occasion, especially Easter lunch, where it adds a touch of elegance to your dessert table.
Making chocolate mousse cups is surprisingly easy and requires just a few ingredients. With a preparation time of about 20 minutes and a chilling time to let the mousse set, you can whip these up quickly and have them ready for your guests. Top them off with whipped cream and fresh berries for a colorful, festive look!
Ingredients
- 1 cup heavy cream
- 8 ounces semi-sweet chocolate, chopped
- 2 large eggs, separated
- 1/4 cup granulated sugar
- 1 teaspoon vanilla extract
- Fresh berries for garnish
Instructions
- In a heatproof bowl, melt the chopped chocolate over a saucepan of simmering water. Stir until smooth, then remove from heat and let cool slightly.
- In a separate bowl, whip the heavy cream until soft peaks form. Set aside.
- In another bowl, whisk the egg yolks with granulated sugar and vanilla extract until pale and fluffy. Slowly fold in the melted chocolate.
- Gently fold the whipped cream into the chocolate mixture until well combined.
- In a clean bowl, beat the egg whites until stiff peaks form. Carefully fold them into the chocolate mixture.
- Spoon the mousse into individual cups and refrigerate for at least 2 hours to set.
- Before serving, garnish with a dollop of whipped cream and fresh berries.
Easter Basket Cake
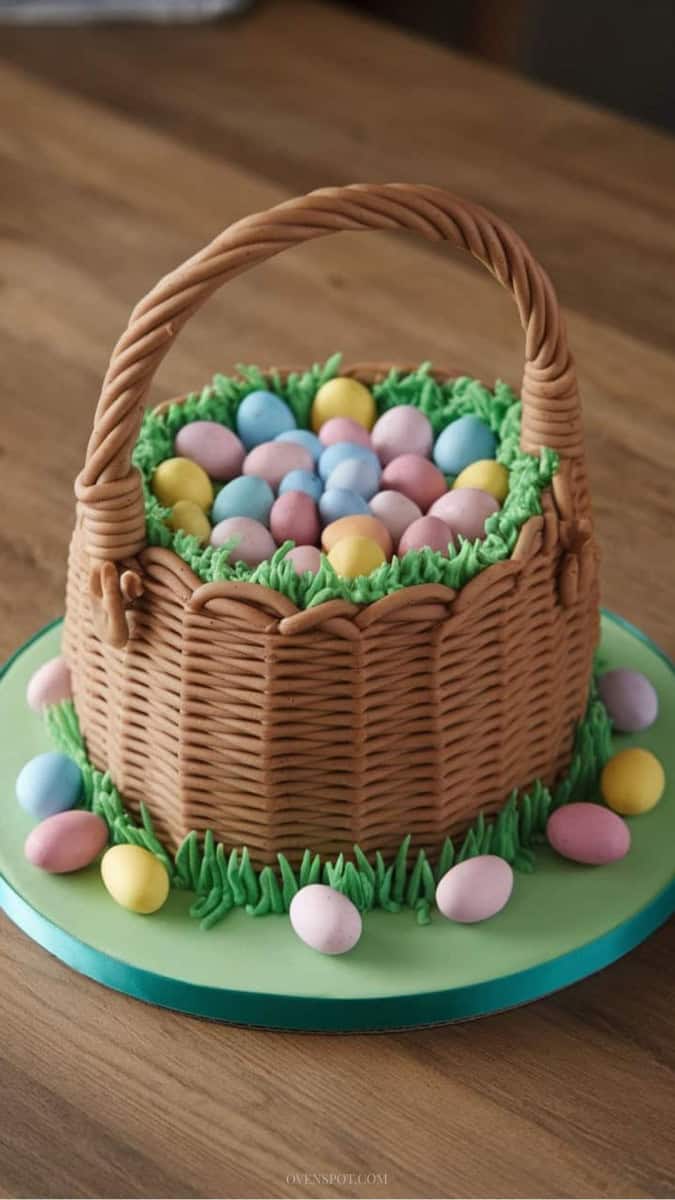
If you’re looking for a centerpiece dessert that instantly says “Easter,” this Easter basket cake is it. Decorated to look like a woven wicker basket and filled with colorful candy eggs, it’s charming, festive, and surprisingly achievable at home.
Perfect for Easter brunch or dessert, this cake doubles as decoration and sweet treat all in one.
Ingredients
For the Cake
- 2 boxes vanilla or yellow cake mix (or your favorite homemade recipe)
- Ingredients listed on cake mix (eggs, oil, water)
For the Buttercream Frosting
- 1 ½ cups (340g) unsalted butter, softened
- 5–6 cups powdered sugar
- 2–3 tablespoons milk
- 2 teaspoons vanilla extract
- Brown gel food coloring
- Green gel food coloring
For Decorating
- Mini pastel chocolate eggs
- Round piping tip (for basket weave)
- Grass piping tip
- Cake board
Instructions
1. Bake the Cake
Prepare and bake two 8-inch round cakes according to package or recipe instructions.
Let cool completely.
2. Frost the Cake
Stack the cakes with a thin layer of buttercream in between. Tint most of the frosting brown using gel food coloring. Apply a smooth crumb coat and chill for 20 minutes. Frost again with brown buttercream.
3. Create the Basket Weave
Using a round piping tip:
- Pipe vertical lines around the sides of the cake.
- Pipe horizontal lines over them in short sections to create a woven effect.
This gives the realistic wicker basket texture.
4. Add the Grass
Tint remaining frosting green. Using a grass piping tip, pipe short upward strokes around the top edge and base of the cake to resemble grass.
5. Fill the Basket
Place pastel chocolate eggs in the center of the cake. If desired, create a handle using fondant shaped and supported with skewers (insert carefully before serving).
Let the cake set slightly before slicing. It’s festive, playful, and perfect for Easter celebrations.
Cherry Almond Tart

This tart is a treat that combines the sweet-tartness of cherries with a subtle almond flavor. The buttery crust offers a satisfying crunch that perfectly complements the glossy cherry filling. It’s a simple dessert to whip up, making it an excellent choice for Easter celebrations or any spring gathering.
The tart’s vibrant colors and rich flavors are sure to impress your guests, yet it requires minimal effort. Whether served warm or chilled, this dessert is a charming addition to any table.
Ingredients
- 1 pre-made pie crust
- 2 cups fresh or frozen cherries, pitted
- 1 cup cherry preserves
- 1/4 cup almond flour
- 1/4 cup granulated sugar
- 1 teaspoon vanilla extract
- 1/4 teaspoon almond extract
- 1 tablespoon cornstarch
- 1 tablespoon lemon juice
- Sliced almonds for topping (Optional)
Instructions
- Preheat the oven to 350°F (175°C). Fit the pie crust into a tart pan and pierce the bottom with a fork.
- In a medium bowl, combine the cherries, cherry preserves, almond flour, granulated sugar, vanilla extract, almond extract, cornstarch, and lemon juice. Mix until well combined.
- Pour the cherry mixture into the prepared crust, spreading it evenly. Top with sliced almonds.
- Bake for 30-35 minutes, or until the filling is bubbly and the crust is golden brown.
- Allow the tart to cool slightly before serving. Enjoy it warm or chilled!
Bunny Cupcakes

These bunny cupcakes with a fluffy vanilla cake base topped with creamy frosting, bring a playful touch to your dessert table. The light and sweet flavors make them a hit with both kids and adults alike.
Creating these cupcakes is simpler than you might think! They require basic baking skills, and decorating them is part of the fun. Let your creativity run wild as you transform each cupcake into an adorable bunny.
Ingredients
- 1 ½ cups all-purpose flour
- 1 cup granulated sugar
- ½ cup unsalted butter, softened
- 2 large eggs
- 1 teaspoon vanilla extract
- 1 ½ teaspoons baking powder
- ½ cup milk
- 2 cups buttercream frosting
- Pink and white fondant (for bunny ears)
- Colorful candies (for eyes and nose)
Instructions
- Preheat your oven to 350°F (175°C) and line a cupcake tin with liners.
- In a mixing bowl, cream together the softened butter and sugar until fluffy. Add in the eggs one at a time, followed by the vanilla.
- In another bowl, combine the flour and baking powder. Gradually add this mixture to the creamed mixture, alternating with the milk. Mix until just combined.
- Fill each cupcake liner about two-thirds full with batter. Bake for 18-20 minutes or until a toothpick inserted comes out clean.
- Let the cupcakes cool completely before frosting them with buttercream.
- To create bunny faces, cut out ears from pink and white fondant and place them on top of the frosted cupcakes. Use colorful candies for the eyes and nose to finish off the look.
- Alternatively, decorate with what you can get your hands on easily!
Easter Egg Cookies
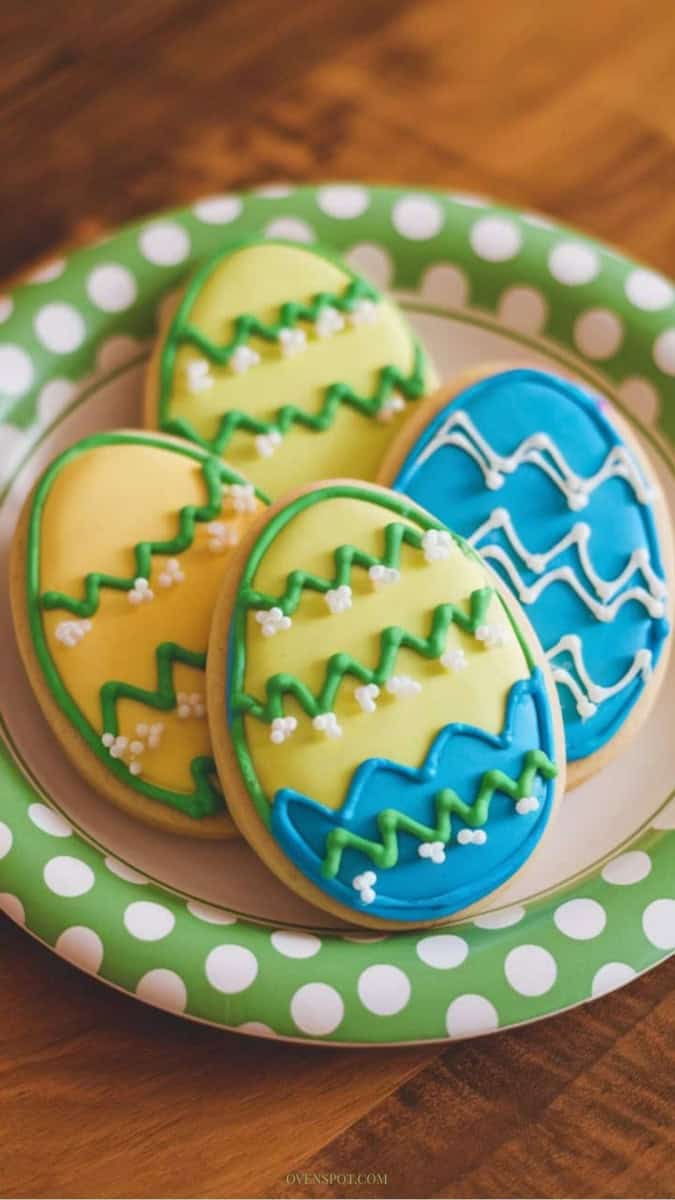
These decorated Easter egg sugar cookies are cheerful, colorful, and perfect for celebrating spring. With a soft, buttery sugar cookie base and smooth royal icing in pastel shades, they’re as fun to decorate as they are to eat.
Whether you’re baking with kids or creating a beautiful Easter dessert platter, these cookies bring instant festive charm to your table.
Ingredients
For the Sugar Cookies
- 2 ¾ cups all-purpose flour
- 1 teaspoon baking powder
- ½ teaspoon salt
- 1 cup unsalted butter, softened
- 1 ½ cups granulated sugar
- 1 large egg
- 1 ½ teaspoons vanilla extract
- ½ teaspoon almond extract (optional)
For the Royal Icing
- 3 cups powdered sugar
- 2 tablespoons meringue powder
- 5–6 tablespoons warm water
- Gel food coloring (yellow, blue, green)
- White nonpareil sprinkles (optional)
Instructions
1. Make the Dough
- In a bowl, whisk together flour, baking powder, and salt.
- In a separate mixing bowl, beat butter and sugar until light and fluffy.
Add egg, vanilla, and almond extract. - Gradually mix in dry ingredients until a soft dough forms.
- Wrap and chill for at least 1 hour.
2. Cut and Bake
- Preheat oven to 350°F (175°C).
- Roll dough to about ¼ inch thick on a lightly floured surface.
- Cut into egg shapes and place on a parchment-lined baking sheet.
- Bake for 8–10 minutes, until edges are lightly golden.
- Cool completely before decorating.
3. Make the Icing
- Beat powdered sugar, meringue powder, and water until smooth and glossy.
- Divide into bowls and tint with gel food coloring.
- Adjust consistency: Thicker for piping borders and slightly thinner for flooding centers.
4. Decorate
- Pipe an outline around each cookie.
- Flood the center with icing and let set slightly.
- Add zigzag designs and small white sprinkles before icing fully dries.
- Allow cookies to dry completely (at least 4 hours) before stacking.
These cookies are bright, playful, and perfect for Easter baskets, dessert tables, or gifting.
Pistachio and Orange Blossom Cake

This pistachio and orange blossom cake is a fresh spring treat that brings a unique twist to traditional desserts, perfect for Easter celebrations. The cake is moist and flavorful, with the nutty taste of pistachios harmonizing beautifully with the fragrant orange blossom. It’s a simple recipe that’s easy to follow, making it great for bakers of all skill levels.
The combination of textures and flavors will impress your family and friends, and it’s a lovely way to end your holiday meal. Adding a touch of floral sweetness, this cake is sure to become a seasonal favorite.
Ingredients
- 1 cup shelled pistachios
- 1 1/2 cups all-purpose flour
- 1 teaspoon baking powder
- 1/2 teaspoon baking soda
- 1/4 teaspoon salt
- 1/2 cup unsalted butter, softened
- 1 cup granulated sugar
- 2 large eggs
- 1/2 cup milk
- 2 tablespoons orange blossom water
- 1 teaspoon vanilla extract
Instructions
- Preheat the oven to 350°F (175°C) and grease a 9-inch round cake pan.
- In a food processor, grind the pistachios until finely chopped. Set aside.
- In a bowl, combine flour, baking powder, baking soda, and salt. In a separate large bowl, beat the butter and sugar until light and fluffy.
- Add the eggs one at a time, mixing well after each addition. Blend in the milk, orange blossom water, and vanilla extract.
- Gradually add the dry ingredients to the wet mixture, folding in the ground pistachios until just combined.
- Pour the batter into the prepared cake pan and smooth the top. Bake for 25-30 minutes or until a toothpick comes out clean.
- Let the cake cool in the pan for 10 minutes before transferring it to a wire rack to cool completely. Serve as is or frost with your favorite icing.
Coconut Macaroon Nests

Coconut macaroon nests are an easy fun dessert that combine the sweet, chewy texture of coconut with a fun, festive design perfect for Easter. These little nests are not only adorable but also easy to make, making them a great project for bakers of all skill levels. With a crispy exterior and a moist, coconut-filled center, they provide a satisfying bite that is sure to please.
The nests are usually filled with chocolate or colorful candies, resembling little bird’s nests, which adds a playful touch for the holiday. They are a fantastic way to incorporate the flavors of coconut into your Easter celebrations, inviting smiles from friends and family alike.
Ingredients
- 2 2/3 cups sweetened shredded coconut
- 2/3 cup sweetened condensed milk
- 1 teaspoon vanilla extract
- 1/4 teaspoon almond extract (optional)
- 2 large egg whites
- 1/4 teaspoon salt
- Chocolate or candy eggs for filling
Instructions
- Preheat the oven to 325°F (160°C) and line a baking sheet with parchment paper.
- In a large bowl, combine shredded coconut, sweetened condensed milk, vanilla extract, and almond extract (if using). Mix until well combined.
- In a separate bowl, beat egg whites and salt until stiff peaks form. Gently fold the egg whites into the coconut mixture.
- Using a tablespoon, scoop the mixture onto the prepared baking sheet, forming small mounds. Use your thumb to create a nest shape by pressing down in the center of each mound.
- Bake for 20-25 minutes until golden brown. Allow cooling on the baking sheet for a few minutes before transferring to a wire rack.
- Once cooled, fill the nests with chocolate or candy eggs for decoration. Enjoy your festive coconut macaroon nests!
Lemon Cream Pie with Fresh Berries

Lemon cream pie with fresh berries is a dessert that brings bright colors and flavors to your table. The tangy lemon filling pairs beautifully with a creamy texture, making it both refreshing and indulgent. Topped with a colorful mix of fresh berries, this pie not only tastes fantastic but also looks inviting and festive, perfect for your Easter celebrations.
This recipe is simple enough for bakers of any skill level. With just a few steps, you can create a pie that will impress your family and friends. The combination of sweet, tart, and creamy makes each bite yum.
Ingredients
- 1 pre-made graham cracker crust
- 1 cup granulated sugar
- 2 tablespoons cornstarch
- 1/4 teaspoon salt
- 1 cup water
- 3 large egg yolks, beaten
- 1/2 cup fresh lemon juice
- 2 tablespoons lemon zest
- 2 tablespoons unsalted butter
- 1 cup heavy cream
- 1/4 cup powdered sugar
- 1 teaspoon vanilla extract
- Assorted fresh berries (strawberries, blueberries, raspberries, blackberries)
Instructions
- In a saucepan, whisk together sugar, cornstarch, and salt. Gradually add water and cook over medium heat, stirring until the mixture thickens and bubbles. Remove from heat.
- Slowly whisk a small amount of the hot mixture into the beaten egg yolks to temper them. Then, whisk the egg yolk mixture back into the saucepan. Return to heat and cook for 2 more minutes, then remove from heat.
- Stir in lemon juice, lemon zest, and butter until smooth. Pour the filling into the prepared crust and let it cool at room temperature.
- In a mixing bowl, beat heavy cream, powdered sugar, and vanilla extract until soft peaks form. Spread the whipped cream over the cooled lemon filling.
- Decorate the pie with fresh berries. Chill in the refrigerator for at least 2 hours before serving.
Springtime Strawberry Shortcake

Strawberry shortcake is a cake that perfectly captures the essence of the season. With layers of soft, buttery shortcake, sweet strawberries, and fluffy whipped cream, this dessert is refreshing. The blend of flavors and textures creates a classic dessert that everyone will enjoy.
This recipe is for us more experienced bakers and it a great option for Easter gatherings or springtime brunches. The juicy strawberries add a burst of flavor, while the creaminess of the whipped topping brings everything together.
Ingredients
- 2 cups fresh strawberries, hulled and sliced
- 1/4 cup granulated sugar
- 2 cups all-purpose flour
- 1/4 cup granulated sugar (for the cake)
- 1 tablespoon baking powder
- 1/2 teaspoon salt
- 1/4 cup unsalted butter, cold and cubed
- 3/4 cup milk
- 1 teaspoon vanilla extract
- 1 cup heavy whipping cream
- 1/4 cup powdered sugar
Instructions
- In a medium bowl, combine sliced strawberries and 1/4 cup sugar. Mix gently and let sit for about 30 minutes to allow the strawberries to release their juices.
- In a large bowl, whisk together flour, 1/4 cup sugar, baking powder, and salt. Cut in the cold butter until the mixture resembles coarse crumbs. Stir in milk and vanilla until just combined.
- Preheat your oven to 425°F (220°C). Spread the batter onto a floured surface and shape into a rectangle about 1-inch thick. Cut out rounds with a biscuit cutter and place on a lined baking sheet. Bake for 12-15 minutes until golden.
- While the cakes are baking, beat the heavy cream and powdered sugar with a hand mixer until soft peaks form.
- Once the cakes are cooled, slice them in half. Layer sliced strawberries and whipped cream between the halves and top with more strawberries and whipped cream before serving.
Carrot Cake with Cream Cheese Frosting

Carrot cake is a much loved dessert that perfectly balances sweetness with a hint of spice. Its moist texture and rich flavor make it a favorite for many during the Easter celebrations. The addition of cream cheese frosting adds a creamy tang that complements the cake beautifully.
This recipe is simple to follow, making it a great choice for both beginner and experienced bakers. You’ll love how easy it is to whip up this treat, bringing a touch of spring to your dessert table.
Ingredients
- 2 cups all-purpose flour
- 2 cups granulated sugar
- 1 teaspoon baking powder
- 1 teaspoon baking soda
- 1 teaspoon ground cinnamon
- 1/2 teaspoon salt
- 1 cup vegetable oil
- 4 large eggs
- 3 cups grated carrots
- 1 cup crushed pineapple, drained
- 1/2 cup chopped walnuts (optional)
- 1 cup cream cheese, softened
- 1/2 cup unsalted butter, softened
- 4 cups powdered sugar
- 1 teaspoon vanilla extract
Instructions
- Preheat the oven to 350°F (175°C). Grease and flour two 9-inch round cake pans.
- In a large bowl, whisk together the flour, sugar, baking powder, baking soda, cinnamon, and salt.
- In another bowl, mix the oil, eggs, grated carrots, and crushed pineapple. Combine the wet and dry ingredients until just mixed. Fold in the chopped walnuts if using.
- Divide the batter evenly between the prepared pans and bake for 25-30 minutes, or until a toothpick inserted in the center comes out clean.
- Allow the cakes to cool in the pans for 10 minutes before transferring to wire racks to cool completely.
- For the frosting, beat together the cream cheese and butter until smooth. Gradually add the powdered sugar and vanilla, mixing until creamy.
- Once the cakes have cooled, frost the top of one layer, place the second layer on top, and frost the top and sides of the cake. Decorate as desired before serving.
Mini Cheesecakes with Fruit Toppings

Mini cheesecakes are a treat that combines the creamy, rich flavor of traditional cheesecake with the freshness of fruit toppings. They are easy to make and perfect for gatherings, especially during Easter celebrations. These little bites of joy are not only satisfying to eat but also visually appealing, making them a hit at any dessert table.
The crust is typically made from crushed Graham crackers, providing a delicious crunch that complements the smooth cheesecake filling. You can top them with an array of fruits such as strawberries, blueberries, and mangoes, bringing a burst of color and flavor. These mini cheesecakes are sure to please everyone!
Ingredients
- 1 1/2 cups graham cracker crumbs
- 1/4 cup granulated sugar
- 1/3 cup unsalted butter, melted
- 8 ounces cream cheese, softened
- 1/2 cup granulated sugar
- 1 teaspoon vanilla extract
- 2 large eggs
- 1/2 cup sour cream
- Fresh fruits for topping (strawberries, blueberries, mango, etc.)
Instructions
- Preheat your oven to 325°F (160°C). Line a muffin tin with cupcake liners.
- In a bowl, mix the graham cracker crumbs, 1/4 cup sugar, and melted butter until well combined. Press this mixture firmly into the bottom of each cupcake liner.
- In a separate bowl, beat the cream cheese until smooth. Add the 1/2 cup sugar, vanilla extract, and mix until combined. Then add the eggs one at a time, mixing until just blended. Finally, stir in the sour cream.
- Pour the cheesecake filling over the crusts, filling each liner about 3/4 full.
- Bake for 18-20 minutes, or until the centers are set. Let them cool to room temperature, then refrigerate for at least 2 hours.
- Before serving, top each mini cheesecake with your choice of fresh fruits.
Chocolate Egg Surprise Cupcakes

Chocolate egg surprise cupcakes are delicious little treats that are perfect for Easter celebrations. With a moist and fluffy vanilla cupcake base, these cupcakes are filled with a surprise of rich chocolate and topped with colorful frosting, making them a visual and taste sensation. The combination of textures from the soft cake to the creamy frosting and the crunchy candy eggs creates a fun eating experience for everyone.
This recipe is not only yummy but also simple to make, making it a great option for bakers of any level. They’re sure to be a hit at any Easter gathering, bringing smiles to both kids and adults alike!
Ingredients
- 1 1/2 cups all-purpose flour
- 1 cup granulated sugar
- 1/2 cup unsalted butter, softened
- 2 large eggs
- 1/2 cup milk
- 2 teaspoons baking powder
- 1 teaspoon vanilla extract
- 1/4 teaspoon salt
- 1 cup colored frosting
- Chocolate eggs and sprinkles for decoration
Instructions
- Preheat the oven to 350°F (175°C) and line a cupcake tin with paper liners.
- In a bowl, cream together softened butter and sugar until light and fluffy. Add eggs one at a time, mixing well after each addition. Stir in vanilla.
- In another bowl, mix together flour, baking powder, and salt. Gradually add this dry mixture to the wet ingredients, alternating with milk. Mix until just combined.
- Fill each cupcake liner about halfway with batter, and bake for 18-20 minutes or until a toothpick comes out clean. Let them cool completely.
- Once cooled, use a small knife to cut a cone shape from the center of each cupcake and fill with chocolate frosting. Replace the cut-out piece on top.
- Frost the cupcakes with your favorite colored frosting and top with chocolate eggs and sprinkles.
Chocolate Egg Nest Brownies
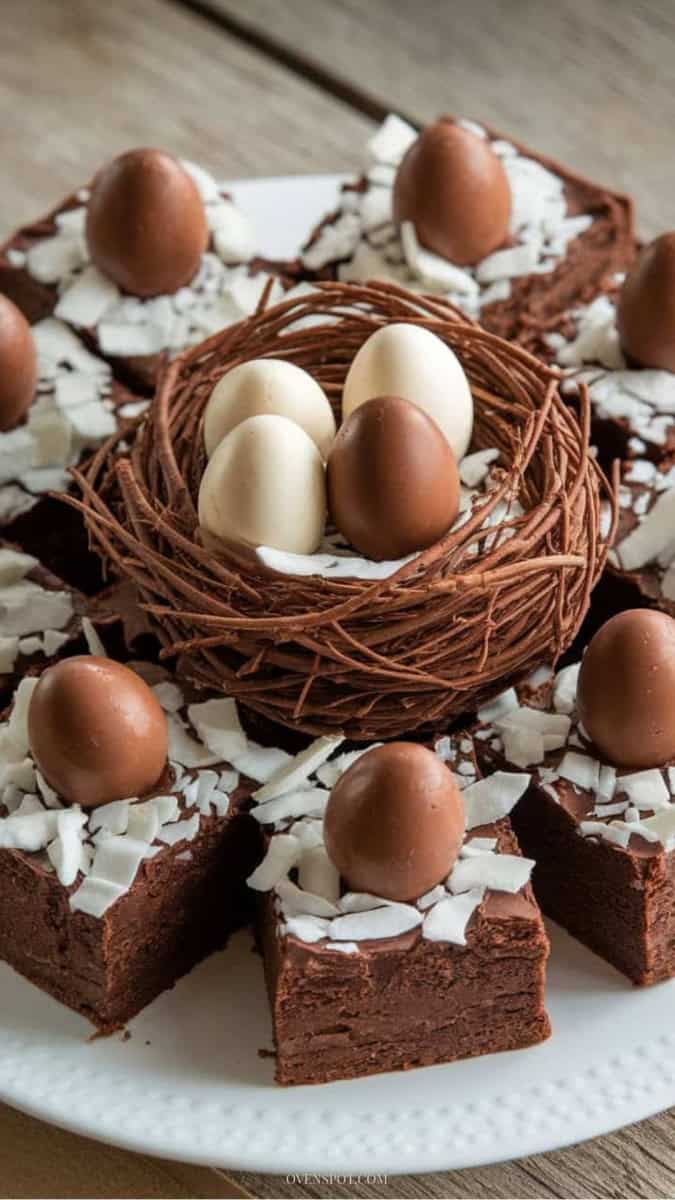
These chocolate egg nest brownies are rich, fudgy, and completely irresistible. Topped with shredded coconut and mini chocolate eggs, they’re simple to make but look beautifully festive for Easter.
Whether you’re serving them at brunch or adding them to a dessert table, they bring that perfect mix of chocolate indulgence and playful holiday charm.
Ingredients
For the Brownies
- 1 cup (225g) unsalted butter, melted
- 1 ½ cups (300g) granulated sugar
- ¾ cup (150g) brown sugar
- 3 large eggs
- 1 teaspoon vanilla extract
- 1 cup (120g) all-purpose flour
- ¾ cup (75g) unsweetened cocoa powder
- ½ teaspoon salt
- ½ cup chocolate chips (optional for extra richness)
For the Topping
- 1 cup shredded coconut (sweetened or unsweetened)
- 12–16 mini chocolate eggs
- ½ cup melted chocolate (for decorative nest, optional)
Instructions
1. Bake the Brownies
- Preheat oven to 350°F (175°C). Line an 8×8-inch baking pan with parchment paper.
- In a large bowl, whisk together melted butter and both sugars.
Add eggs and vanilla; mix until smooth. - Stir in flour, cocoa powder, and salt until just combined. Fold in chocolate chips if using.
- Pour batter into prepared pan and bake for 25–30 minutes, until the center is set but still slightly fudgy.
- Cool completely before cutting.
2. Add the Coconut
Lightly toast coconut in a dry pan over medium heat for 3–5 minutes (optional but adds flavor). Sprinkle coconut over cooled brownies.
3. Create the Nests
- Drizzle melted chocolate in circular patterns onto parchment paper to form small nest shapes.
- Refrigerate for 10–15 minutes until set.
- Place chocolate nests on top of brownies and fill with mini chocolate eggs.
- Cut into squares and serve. They’re rich, festive, and perfect for Easter gatherings.
Raspberry Lemonade Bars

Raspberry lemonade bars are a favorite treat for any spring occasion. The tangy lemon flavor pairs beautifully with the sweet raspberry layer, offering a refreshing taste that feels like sunshine on your palate. These bars are simple to make, making them perfect for both novice bakers and seasoned pros.
With a buttery crust and a smooth, vibrant filling, these bars are not only tasty but also visually appealing. Dust them with powdered sugar for an elegant finish, and you’ll have a dessert that feels special without requiring too much effort.
Ingredients
- 1 cup all-purpose flour
- 1/4 cup powdered sugar
- 1/2 cup unsalted butter, softened
- 1 cup granulated sugar
- 2 large eggs
- 1/2 cup fresh lemon juice
- 2 tablespoons lemon zest
- 1/4 cup raspberry puree (fresh or frozen)
- 1/4 cup chopped raspberries (fresh or frozen)
- 1/4 teaspoon salt
- Powdered sugar for dusting
Instructions
- Preheat your oven to 350°F (175°C). Grease an 8×8-inch baking dish.
- In a mixing bowl, combine flour and powdered sugar. Cut in the softened butter until the mixture resembles coarse crumbs. Press the mixture into the bottom of the prepared baking dish.
- Bake the crust for about 15 minutes or until lightly golden.
- In another bowl, whisk together granulated sugar, eggs, lemon juice, lemon zest, and salt until smooth. Gently swirl in the raspberry puree.
- Gently add the chopped raspberries to the filling before pouring over the crust.
- Pour the filling over the pre-baked crust. Bake for an additional 20-25 minutes, or until the filling is set.
- Allow the bars to cool completely before cutting into squares. Dust with powdered sugar before serving.
Mango Mousse in Chocolate Cups

Mango mousse in chocolate cups is a sweet treat that combines the tropical sweetness of mango with the rich flavor of chocolate. This dessert is not only visually appealing but also incredibly satisfying with its creamy texture and vibrant taste. The contrast between the smooth mousse and the crispy chocolate shell creates a fun and delicious experience.
This recipe is straightforward and perfect for any occasion, especially Easter celebrations. It’s a great way to impress your guests without spending hours in the kitchen. Plus, the individual chocolate cups make them easy to serve and enjoy!
Ingredients
- 1 cup ripe mango puree
- 1 cup heavy cream
- 1/2 cup powdered sugar
- 1 teaspoon vanilla extract
- 1/2 teaspoon gelatin (optional)
- 1 cup dark chocolate chips
- Fresh mint leaves for garnish
Instructions
- Melt the dark chocolate chips in a microwave or double boiler. Once melted, let it cool slightly. Using a pastry brush or the back of a spoon, coat the inside of silicone or paper cupcake liners with a layer of melted chocolate. Allow to harden in the refrigerator for about 30 minutes.
- In a large bowl, whip the heavy cream until soft peaks form. In another bowl, mix the mango puree, powdered sugar, vanilla extract, and gelatin (if using). Gently fold the whipped cream into the mango mixture until well combined.
- Once the chocolate cups are ready, carefully remove them from the molds. Fill each chocolate cup with the mango mousse mixture and smooth the top.
- Refrigerate for at least 2 hours to set. Before serving, garnish with fresh mint leaves for an extra pop of color and flavor.
Vanilla Bean Panna Cotta with Passion Fruit
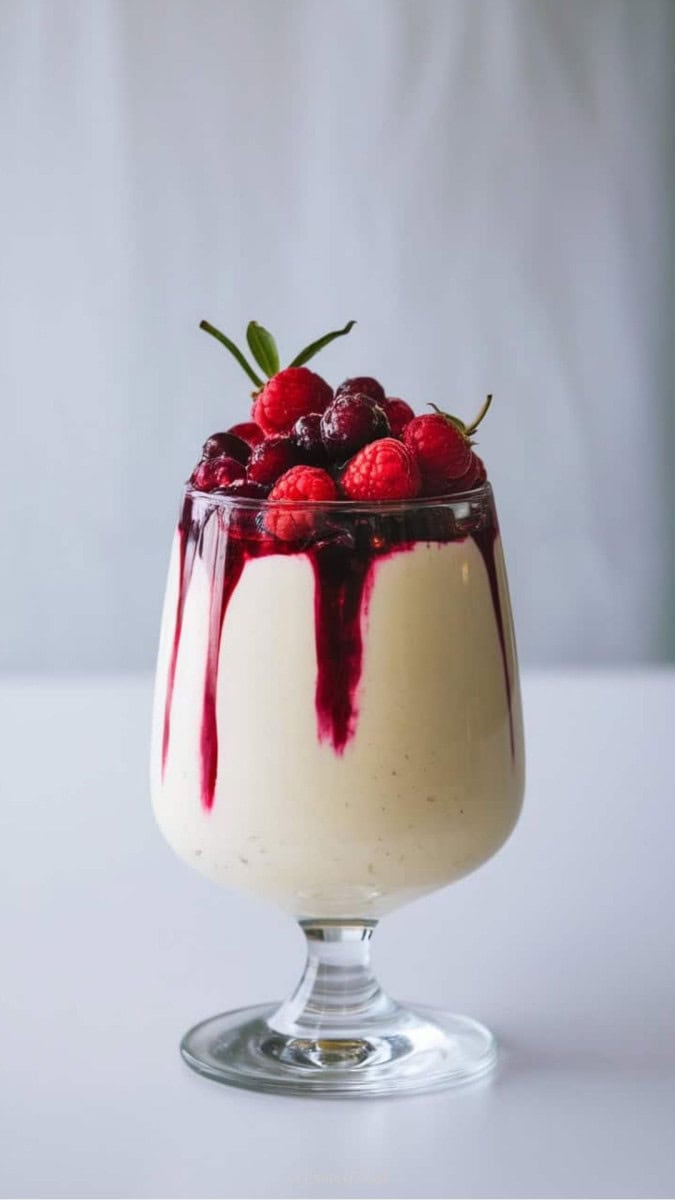
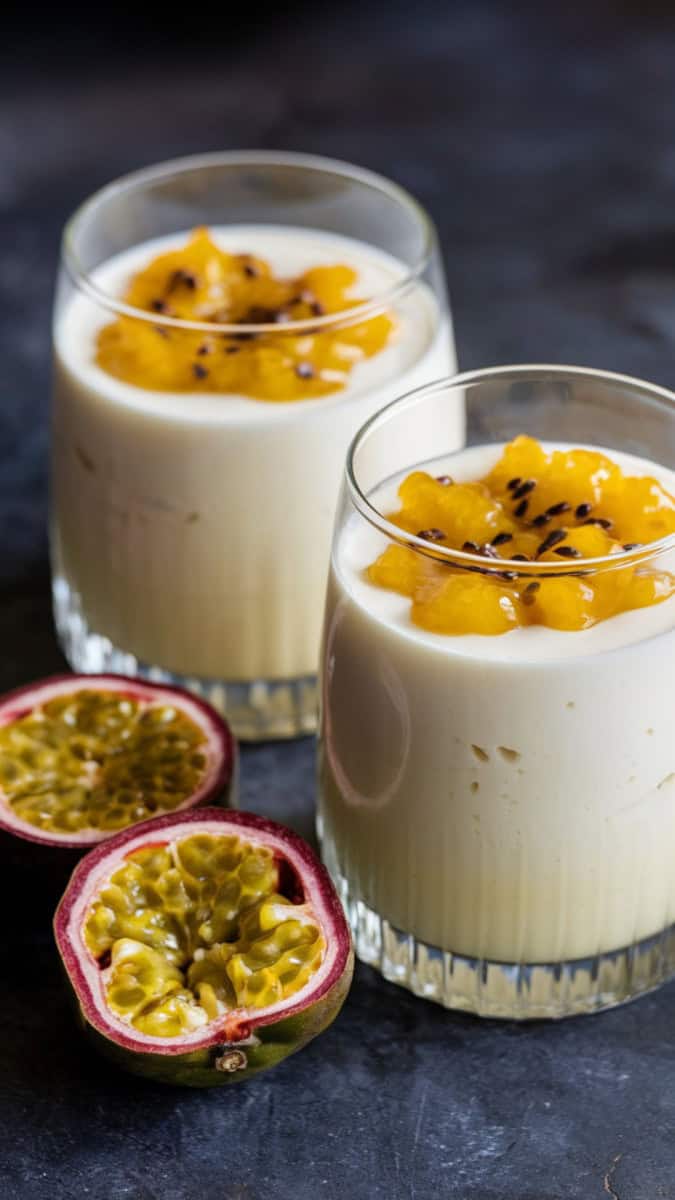
Vanilla bean panna cotta is a creamy, delicate dessert that combines the rich flavor of vanilla with a smooth, velvety texture. Topped with a tangy passion fruit sauce, it offers a contrast that brightens up the palate. This dessert is not only simple to make but also a showstopper, making it perfect for your Easter gathering.
The panna cotta sets beautifully and can be prepared a day in advance, allowing you to enjoy your time with family and friends. The passion fruit adds a tropical twist that elevates this classic dessert, making it feel special and festive.
Ingredients
- 2 cups heavy cream
- 1/2 cup whole milk
- 1/2 cup granulated sugar
- 1 tablespoon vanilla bean paste
- 2 1/2 teaspoons gelatin powder
- 3 tablespoons cold water
- 2-3 ripe passion fruits
- 1 tablespoon honey (optional)
Instructions
- In a small bowl, sprinkle gelatin over cold water and let it bloom for about 5 minutes.
- In a saucepan, combine heavy cream, whole milk, sugar, and vanilla bean paste. Heat over medium heat until it just begins to simmer, stirring regularly.
- Remove the saucepan from heat. Stir in the bloomed gelatin until fully dissolved.
- Pour the mixture into serving glasses or molds. Refrigerate for at least 4 hours or until set.
- Cut passion fruits in half and scoop out the pulp. If desired, mix in honey for added sweetness. Spoon the passion fruit sauce over the panna cotta just before serving.
- Try berries for a fresh spring topping choice.
Bunny-Shaped Sugar Cookies

Bunny-shaped sugar cookies are a treat that captures the spirit of Easter in every bite. These cookies are soft, sweet, and can be decorated in a variety of fun colors and designs, making them perfect for kids and adults alike. They’re simple to make, inviting the whole family to join in on the decorating fun!
The buttery flavor of these cookies pairs wonderfully with bright royal icing or fondant, turning each cookie into a cute little bunny ready to hop onto your dessert table. Whether you’re hosting a spring celebration or just want a sweet snack, these cookies are sure to bring a smile!
Ingredients
- 2 ¾ cups all-purpose flour
- 1 teaspoon baking powder
- ½ teaspoon salt
- 1 cup unsalted butter, softened
- 1 ½ cups granulated sugar
- 1 large egg
- 1 teaspoon vanilla extract
- 1 teaspoon almond extract
- Food coloring (optional)
- Royal icing (for decorating)
Instructions
- In a bowl, whisk together the flour, baking powder, and salt. In a separate mixing bowl, beat the softened butter and sugar until light and fluffy. Add the egg, vanilla, and almond extract, mixing until well combined.
- Gradually add the dry ingredients to the wet mixture, mixing until a dough forms. If desired, divide the dough and mix in food coloring to create different colored bunnies.
- Wrap the dough in plastic wrap and chill in the refrigerator for at least 1 hour.
- Preheat your oven to 350°F (175°C). Roll out the chilled dough on a floured surface to about ¼ inch thick. Use bunny-shaped cookie cutters to cut out shapes and place them on a baking sheet lined with parchment paper.
- Bake for 8-10 minutes, or until the edges are lightly golden. Remove from the oven and let cool completely on a wire rack.
- Once cooled, use royal icing to decorate your bunny cookies. Let the icing set before serving.
Pavlova with Fresh Berries
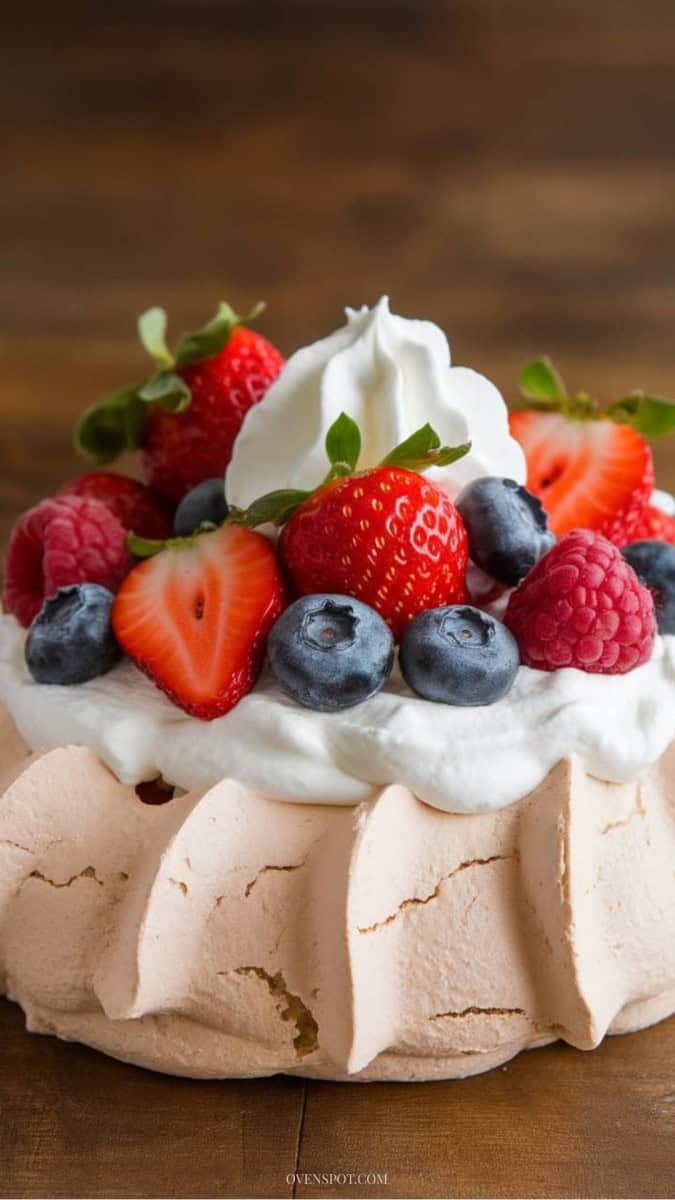
Pavlova is a delightful meringue dessert topped with fresh fruits. This version shines with vibrant strawberries, raspberries, and blueberries. The fluffy whipped cream on top adds a creamy texture that perfectly balances the sweetness of the meringue.
This dessert is a standout choice for any Easter gathering. The colors of the berries bring a festive touch, making it a centerpiece at the table. Each bite is a mix of crunchy meringue and juicy berries, creating a lovely contrast.
Making a pavlova is pretty simple. You’ll need egg whites, sugar, vinegar, and cornstarch for the meringue. Just whip the egg whites until stiff peaks form, gradually adding sugar, and then fold in the vinegar and cornstarch. Bake it low and slow until it’s crisp on the outside and soft inside.
Once baked, let it cool before adding whipped cream and the fresh berries. This dessert not only tastes amazing but also looks stunning. Perfect for Easter desserts, it brings a light and refreshing end to the feast.
Chocolate-Dipped Fruit Skewers

Chocolate-dipped fruit skewers are a fresh and colorful treat that combines the natural sweetness of fresh fruit with the rich, creamy flavor of chocolate. They make for an easy and fun dessert option, especially during festive occasions like Easter. Plus, they add a pop of color to your dessert table!
This recipe is simple enough for anyone to try. Just gather your favorite fruits, dip them in melted chocolate, and let them cool. These skewers are not only delicious but also a great way to get your daily dose of fruit while satisfying your chocolate cravings.
Ingredients
- 1 cup strawberries or raspberries, hulled
- 1 cup bannanas or pineapple, cut into cubes
- 1 cup blueberries
- 1 cup chocolate chips (milk or dark)
- Wooden skewers
- Sprinkles or crushed nuts (optional, for topping)
Instructions
- Wash and cut the strawberries and pineapple into bite-sized pieces. Leave the blueberries whole.
- In a microwave-safe bowl, melt the chocolate chips in 30-second intervals, stirring in between until smooth.
- Thread the fruit pieces onto the wooden skewers in any order you like.
- Hold each skewer by one end and dip the fruit into the melted chocolate, allowing any excess to drip off.
- Place the dipped skewers on parchment paper. If desired, sprinkle with toppings like sprinkles or crushed nuts before the chocolate sets. Refrigerate for about 15-20 minutes until the chocolate hardens.
Want a comforting Easter dessert try my easy Dutch oven peach cobbler
Coconut Macaroons

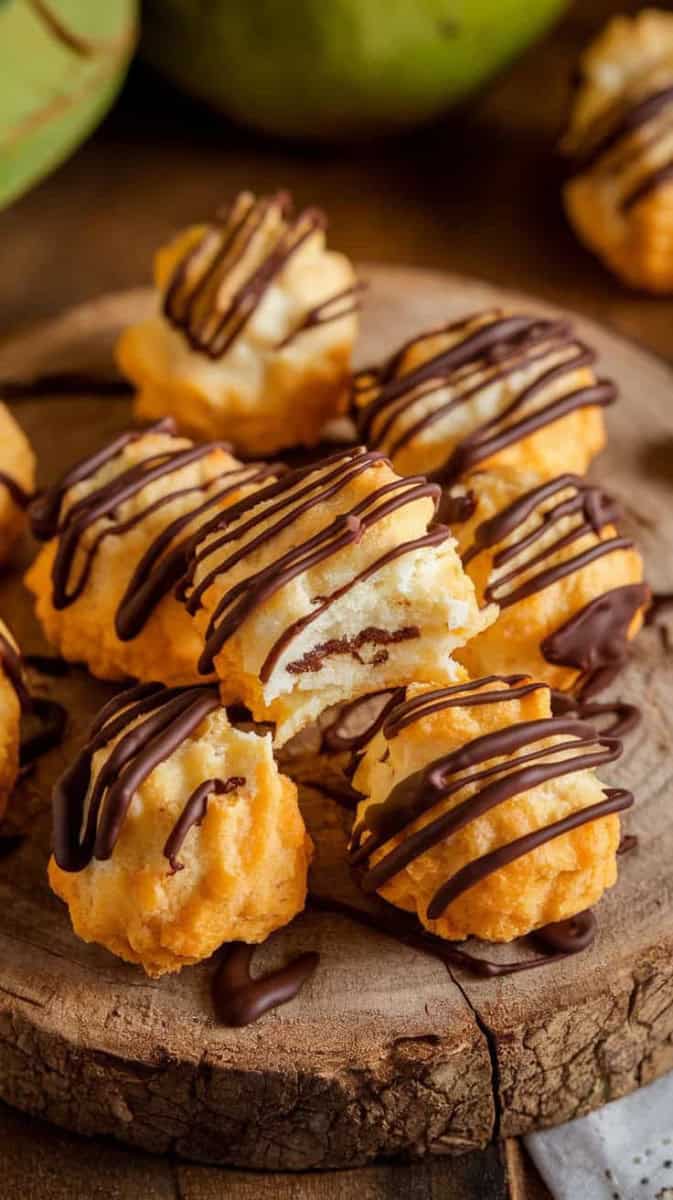
Coconut macaroons are nutty flavored little treats that offer a chewy texture with a hint of sweetness. Made primarily with shredded coconut, they are perfect for those who love coconut flavor in their desserts. These treats are simple to make and can be enjoyed as a sweet addition to your Easter lunch or any gathering.
The combination of crispy edges and a soft, moist center makes them utterly enjoyable. With just a few ingredients, you can whip up a batch in no time. Pair them with a cup of tea or coffee, and you have a delicious snack that everyone will appreciate.
Ingredients
- 3 cups sweetened shredded coconut
- 1/2 cup granulated sugar
- 1/4 teaspoon salt
- 1/2 teaspoon vanilla extract
- 2 large egg whites
- 1/2 cup chocolate chips (optional)
Instructions
- Preheat your oven to 325°F (160°C) and line a baking sheet with parchment paper.
- In a large bowl, combine the shredded coconut, sugar, salt, and vanilla extract.
- In a separate bowl, beat the egg whites until soft peaks form. Gently fold the egg whites into the coconut mixture until well incorporated.
- Using a tablespoon, scoop the mixture onto the prepared baking sheet, spacing them about an inch apart.
- Bake for 20-25 minutes, or until the macaroons are golden brown on the edges.
- If desired, melt the chocolate chips in a microwave-safe bowl and dip the bottom of each macaroon into the chocolate. Let them cool on a wire rack before serving.
Spring Sugar Plums
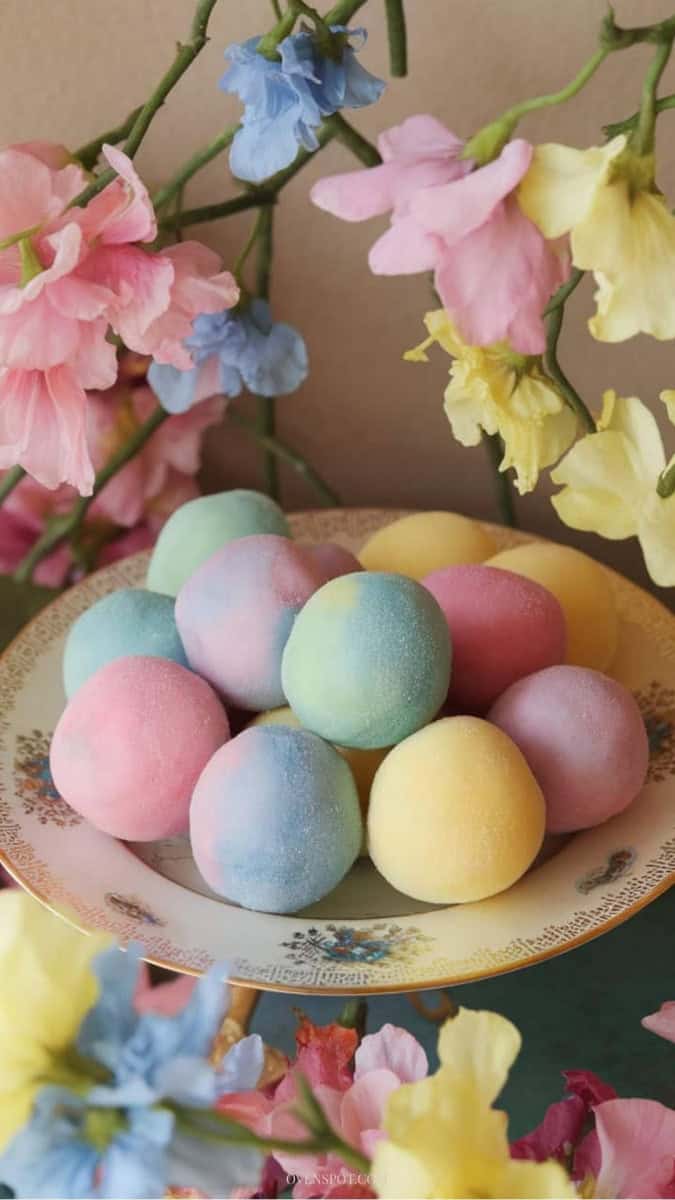
These pastel sugar plums are sweet, soft, and melt gently in your mouth. With their delicate sugar coating and cheerful spring colors, they make a beautiful addition to Easter dessert tables, party favors, or homemade gift boxes.
Simple to make and fun to color, they bring a charming, old-fashioned touch to your celebration.
Ingredients
- 3 cups powdered sugar
- 2 tablespoons light corn syrup
- 2 tablespoons softened butter
- 2–3 tablespoons milk
- ½ teaspoon vanilla extract (or almond extract)
- Gel food coloring (pink, yellow, blue, green)
- Granulated sugar (for coating)
Instructions
1. Make the Base
- In a mixing bowl, combine powdered sugar, softened butter, corn syrup, vanilla, and 2 tablespoons of milk.
- Mix until a soft dough forms. If too dry, add a little more milk (½ teaspoon at a time).
- The mixture should be smooth and pliable like soft fondant.
2. Color the Dough
Divide the mixture into separate portions. Add a small amount of gel food coloring to each portion and knead until evenly tinted in soft pastel shades.
3. Shape the Sugar Plums
Roll small portions of dough into smooth egg or ball shapes. Place on parchment paper.
4. Coat in Sugar
- Lightly roll each piece in granulated sugar to create that soft, frosted finish.
- Allow them to sit at room temperature for 1–2 hours to firm slightly.
- Store in an airtight container for up to one week.
They’re sweet, simple, and beautifully festive perfect for Easter platters or spring celebrations.
Cinnamon Roll Easter Bread

Cinnamon bread rolls are a twist on the traditional cinnamon roll, perfect for celebrating Easter. This sweet, braided bread is soft and fluffy, infused with a warm cinnamon flavor that makes it a treat for everyone at the table. Topped with a light glaze and sprinkled with coarse sugar, it not only tastes delicious but also looks festive and inviting.
This recipe is simple enough for bakers of all skill levels. You’ll enjoy the process of kneading the dough and watching it rise, all while filling your kitchen with the comforting aroma of cinnamon and sugar. Gather your loved ones for a fun baking session, and soon you’ll have a beautiful centerpiece for your Easter brunch!
Ingredients
- 4 cups all-purpose flour
- 1/4 cup granulated sugar
- 2 1/4 teaspoons active dry yeast
- 1 teaspoon salt
- 1/4 cup unsalted butter, melted
- 1 cup milk, warmed
- 2 large eggs
- 1/2 cup brown sugar, packed
- 2 tablespoons ground cinnamon
- 1/4 teaspoon ground nutmeg
- 1/4 cup unsalted butter, softened
- 1 cup powdered sugar
- 1 teaspoon vanilla extract
- Coarse sugar for topping
Instructions
- In a large bowl, combine warmed milk, sugar, and yeast. Let it sit for about 5 minutes until foamy. Stir in melted butter, eggs, and salt. Gradually add flour, mixing until a soft dough forms.
- Turn the dough onto a floured surface and knead for about 5-7 minutes until smooth and elastic. Place in a greased bowl, cover, and let rise in a warm place until doubled in size, about 1 hour.
- In a small bowl, mix brown sugar, cinnamon, and nutmeg. Roll out the dough into a rectangle, spread softened butter over the surface, and sprinkle the cinnamon mixture evenly. Roll tightly and slice into individual rolls.
- Arrange the slices in a circle, gently twist them together to create a braided effect. Place the braided dough in a greased baking dish and let rise for another 30 minutes.
- Preheat the oven to 350°F (175°C). Bake for 25-30 minutes until golden brown and cooked through.
- While the bread is cooling, beat together powdered sugar, vanilla, and a little milk until smooth. Drizzle over the warm bread and finish with a sprinkle of coarse sugar.
Cranberry Hot Cross Buns (Soft & Glazed Easter Classic)
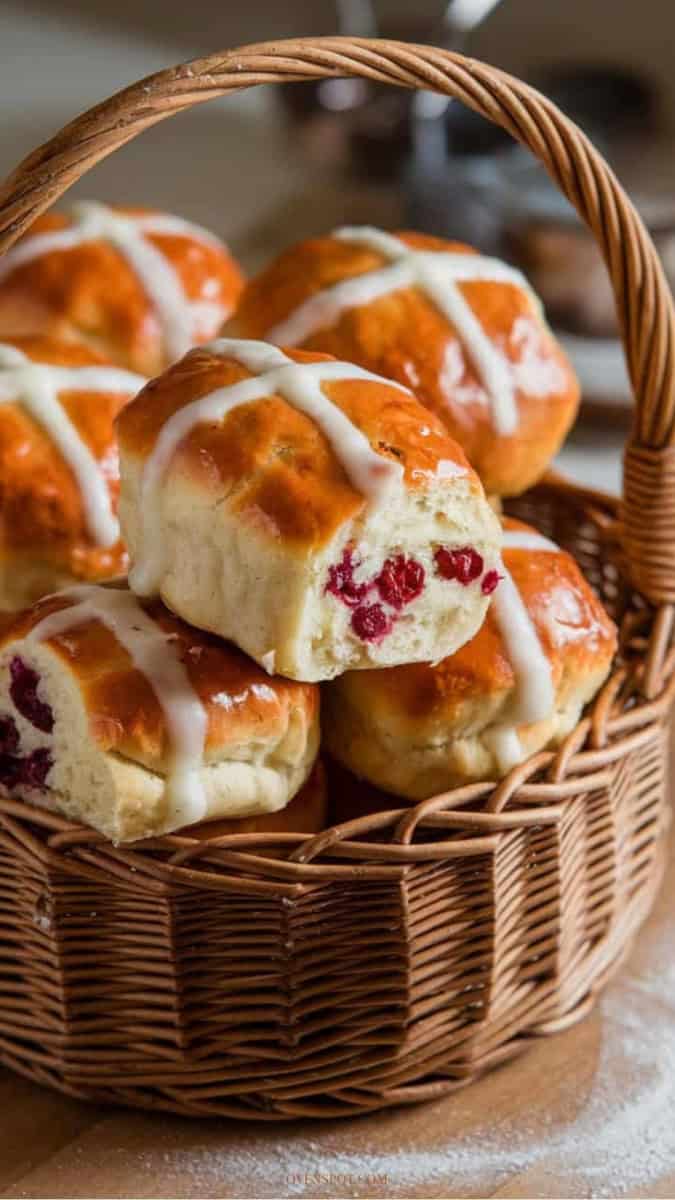
These cranberry hot cross buns are a fresh take on the traditional version. Instead of raisins, they’re studded with sweet-tart dried cranberries that add beautiful bursts of color and flavor in every bite. Lightly spiced, gently sweet, and finished with a simple glaze, they’re perfect for Easter brunch, afternoon tea, or served warm with butter melting into the center.
Ingredients
For the Dough
- 4 cups (500g) all-purpose flour
- 2 ¼ teaspoons (1 packet) active dry yeast
- ¼ cup (50g) granulated sugar
- 1 teaspoon salt
- 1 teaspoon ground cinnamon
- ¼ teaspoon ground nutmeg
- 1 cup (240ml) warm milk (not hot)
- ¼ cup (60g) unsalted butter, melted
- 2 large eggs
- 1 teaspoon vanilla extract
- ¾ cup (100g) dried cranberries
For the Cross
- ½ cup all-purpose flour
- 5–6 tablespoons water
For the Glaze
- ¼ cup apricot jam or honey
- 1 tablespoon warm water
Instructions
1. Activate the Yeast
In a small bowl, combine the warm milk and yeast. Let sit for 5–10 minutes until foamy.
2. Make the Dough
In a large mixing bowl, combine flour, sugar, salt, cinnamon, and nutmeg. Add yeast mixture, melted butter, eggs and vanilla. Mix until a soft dough forms. Stir in dried cranberries.
3. Knead
Turn dough onto a lightly floured surface and knead for 8–10 minutes until smooth and elastic. (You can also use a stand mixer with a dough hook for about 5–6 minutes.) The dough should feel soft but not sticky.
4. First Rise
Place dough in a lightly greased bowl. Cover and let rise in a warm spot for about 1–1½ hours, or until doubled in size.
5. Shape the Buns
- Punch down the dough and divide into 12 equal pieces.
- Roll into smooth balls and place in a greased baking dish or lined baking tray, slightly touching.
- Cover and let rise again for 30–45 minutes until puffy.
6. Pipe the Cross
Preheat oven to 350°F (175°C). Mix flour and water until a thick paste forms. Spoon into a piping bag (or zip-top bag with corner snipped) and pipe a cross on each bun.
7. Bake
Bake for 20–25 minutes, until golden brown on top.
8. Glaze for Shine
Warm the apricot jam or honey with water. Brush over warm buns for that glossy bakery finish.
9. Serve
Serve warm with butter, a little extra honey or lightly toasted the next day. They’re soft, fragrant, and beautifully festive perfect for your Easter dessert spread.
If you’re planning a full holiday menu, you may also enjoy these recipe collections:
- Easter Lunch Ideas
- Delicious Easter Dinner Ideas
- Easter Recipes
- Easter Appetizers
- Easy Easter Side Dishes
- Easter Cake Pops
- Creative Easter Drinks
One-Pot Cooking Rocks!

Michelle
Hi, I’m Michelle, the founder, owner, author, and editor of OvenSpot. My passion for one-pot cooking commenced when I was working to prepare cafeteria lunches for school students. I am now on a mission to assist you in choosing the cooking pot or appliance you will use daily. As well as in-depth information to assist you in using and caring for your cookware and appliances. Along with the yummy recipes I use at home.
Questions? Reach out to Michelle at [email protected]